Creating a Realtime PWA Using Angular and Firebase (Part 1)
We’re going to build a real-time, progressive web application using Angular and Firebase. This is part one.
Access the repository
You can grab the code from GitHub.
If you’re new to Progressive Web Applications (or just curious), I’ve self-published a book on the topic that you can purchase online.
Getting started
First, make sure you’ve got the Angular CLI installed: npm i -g @angular/cli. Then create an Angular app: ng new [project-name] --routing.
Building Out the App
Let’s build the application first and worry about offline capabilities and other PWA features later.
The app will have two routes loading two components. One component displays a feed of photos. The other lets users take pictures. Let’s create both: ng g c feed && ng g c capture.
For routing, edit app-routing.module.ts:
const routes: Routes = [
  { path: '', component: FeedComponent },
  { path: 'capture', component: CaptureComponent },
];
That’s the routing done.
Styling
Any CSS framework would work here, but let’s go with Material Design: ng add @angular/material.
For more on Material Design and Bootstrap in an Angular context, check those articles.
We’ll use three modules from the Material library. Let’s collect them and add them to app.module.ts:
const MatModules = [
  MatButtonModule,
  MatCardModule,
  MatSnackBarModule
];

@NgModule({
  // removed for brevity
  imports: [
    ...MatModules,
  ],
})
Let’s implement the routing in app.component.html:
<div class="navigation">
  <button mat-raised-button color="primary" routerLink="/">Feed</button>
  <button mat-raised-button color="primary" routerLink="/capture">
    Capture
  </button>
</div>
<div class="main-div">
  <router-outlet></router-outlet>
</div>
This adds two buttons that load the different components.
At this point we’ve got a basic application, but the two main features are still missing: capturing a picture and listing them.
Let’s tackle the camera first. Open capture.component.html and add the following:
<mat-card class="z-depth center" flex="50">
<mat-card-header>
<mat-card-title
>Smile - and take a selfie
<span>{{ \uD83D\u0xDE0F }}</span>📱</mat-card-title
>
</mat-card-header>
<video
#video
id="video"
mat-card-image
autoplay
*ngIf="displayStream"
></video>
<canvas
#canvas
id="canvas"
mat-card-image
[width]="width"
[height]="height"
[hidden]="displayStream"
></canvas>
<mat-card-content>
<p>Snap away!</p>
</mat-card-content>
<mat-card-actions *ngIf="actions">
<button
mat-raised-button
color="primary"
(click)="capture()"
*ngIf="displayStream"
>
Capture Photo
</button>
<button
mat-raised-button
color="warn"
(click)="retakePhoto()"
*ngIf="!displayStream"
>
Retake Photo
</button>
<button
mat-raised-button
color="accent"
(click)="usePhoto()"
*ngIf="online && !displayStream"
>
Use photo
</button>
</mat-card-actions>
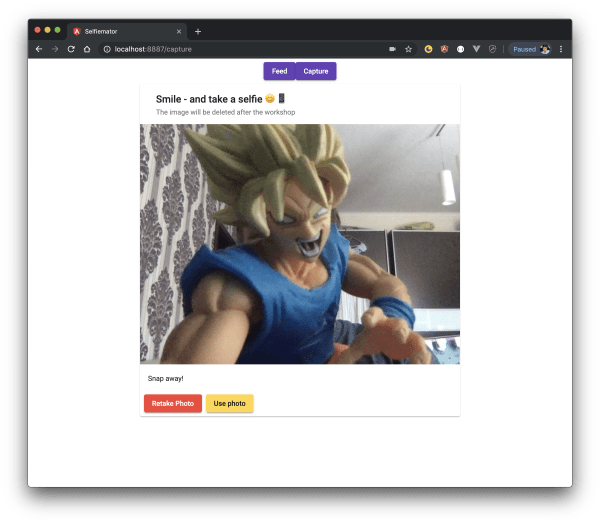
</mat-card>This displays a <canvas> and a few buttons that appear conditionally via ngIf. Here’s how it works: we show a direct stream from the camera (after the user grants consent; the browser handles the prompt automatically). We provide a button to capture a photo. Once taken, the user gets two options: retake it or use it and upload.
We’ll look at the TypeScript behind this component shortly, but first let’s talk about photo management.
Managing photos
As the title suggests, we’re using Firebase for real-time features. Firebase can also store binary data (images) through its cloud storage feature. That would work, but if we want to do more with the uploaded images (apply transformations, run optimisations), we need another tool. We’ll use Cloudinary. They store images and offer excellent optimisation and transformation features.
Setting up Cloudinary
Cloudinary has an SDK for Angular, so we can plug it in easily: npm install cloudinary-core @cloudinary/angular-5.x.
In app.module.ts, add the following:
import { CloudinaryModule } from '@cloudinary/angular-5.x';
import { Cloudinary } from 'cloudinary-core';

export const cloudinaryLib = {
  Cloudinary: Cloudinary
};
@NgModule({
  // removed for brevity
  imports: [
    CloudinaryModule.forRoot(cloudinaryLib, { cloud_name: environment.cloudName, secure: true }),
})
Two things to notice. secure: true is a global setting so Cloudinary always serves images via HTTPS. And cloud_name is your Cloudinary account name, which you get after registering. It makes sense to put this in environment.ts:
export const environment = {
  production: false,
  cloudName: '',
  uploadPreset: '',
};
Cloudinary Fundamentals
Some basics on Cloudinary. When we upload an image, we control how the name looks. It can be filename.jpg (which means we’d overwrite the same image if we don’t change the name programmatically). Cloudinary can also append a unique string: filename_abc123.jpg. Or, the option we’ll pick, a completely random name: abc123.jpg. In Cloudinary’s SDKs, the identifier for a photo (regardless of uniqueness) is called a public ID. That’s the string we’ll save in our database.
Notice the uploadPreset in the environment settings. Since we’ll upload images via an API call, this counts as an “unsigned” upload. Unsigned uploads require an upload preset.
Upload presets let you define default behaviour for uploads, instead of receiving these as parameters during the upload request itself. Parameters can include tags, incoming or on-demand transformations, notification URL, and more. Upload presets take precedence over client-side upload parameters.
Signed uploads happen server-side using an API key and secret, but we should never expose those in a client. That’s why we need unsigned uploads, which always require an upload preset.
Upload Preset
To create an upload preset, log in to your Cloudinary account, hit the cogwheel to access settings, select the ‘upload’ tab, scroll down to ‘Upload presets’ and click ‘Add upload preset’.
Change the ‘Signing Mode’ to ‘unsigned’ and hit ‘save’. Note the upload preset name and add it to the TypeScript file mentioned earlier.
Every uploaded image (and any other asset, like video) is accessible via a URL such as https://res.cloudinary.com/your-cloud-name/image/upload/public_id.extension.
We’ll cover adding optimisation and manipulation to images later.
Firebase
Since the app is real-time driven, it needs a service that delivers that functionality. We’ll have a feed displaying pictures taken by other users. We could use any database, but with Firebase, the feed updates in real time without users having to refresh.
Setting Up Firebase
To get started with Firebase, check the documentation. You’ll need a Google account. Once signed in, create a Firebase project and register your application. For the full walkthrough, see Add Firebase to your JavaScript project.
Data structure
With a Firebase project created, let’s think about data structure. We’ll store documents in a collection called ‘captures’ with this shape:
{
  "public_id": "Cloudinary Public ID",
  "uploaded": "timestamp"
}
You might wonder why we’re only storing the Public ID rather than the full URL. We’ll use the Angular SDK from Cloudinary, where we pass in the public ID plus some options and the URL gets generated automatically. There’s no need to store the entire URL. In fact, storing it would cause headaches later.
Adding Firebase to our App
Install the official Angular library for Firebase: npm install firebase @angular/fire.
Log in to your Firebase console and grab the necessary configuration details (API key, etc.). Add them to environment.ts:
export const environment = {
  production: false,
  cloudName: '',
  uploadPreset: '',
  firebase: {
    apiKey: '',
    authDomain: '',
    databaseURL: '',
    projectId: '',
    storageBucket: '',
    messagingSenderId: '',
  },
};
Then open app.module.ts and set up Firebase:
import { AngularFireModule } from '@angular/fire';
import { AngularFirestoreModule } from '@angular/fire/firestore';
// ...
@NgModule({
  //  removed for brevity
  imports: [
    AngularFireModule.initializeApp(environment.firebase),
    AngularFirestoreModule
  ],
})
With that in place, let’s look at capture.component.ts and the logic behind snapping and uploading a picture.
Good news: Cloudinary also has a promise-based API we can use directly. The flow goes like this: user takes a picture, chooses to use it, the picture gets uploaded to Cloudinary. Once uploaded, an entry is added to Firebase with the data structure we defined. Let’s break it down.
Displaying the video stream
To display the feed we’ll use a canvas (as seen in the HTML above) and navigator.mediaDevices.getUserMedia():
import { Component, OnInit, ViewChild, ElementRef, OnDestroy } from '@angular/core';
import { HttpClient } from '@angular/common/http';
import { environment } from '../../environments/environment';
import { AngularFirestore, AngularFirestoreCollection } from '@angular/fire/firestore';
import { Router } from '@angular/router';

@ViewChild('video')
video: ElementRef;
@ViewChild('canvas')
canvas: ElementRef;

private constraints = {
  video: true,
};
displayStream: boolean;
captureCollectionRef: AngularFirestoreCollection<any>;
width: number;
height: number;
The constructor:
constructor(
  private http: HttpClient,
  private db: AngularFirestore,
  private router: Router) {
    this.displayStream = true;
    this.captureCollectionRef = this.db.collection<any>('captures');
}
And ngOnInit(), where we access the media stream:
ngOnInit() {
    if (navigator.mediaDevices && navigator.mediaDevices.getUserMedia) {
      navigator.mediaDevices.getUserMedia(this.constraints).then(stream => {
        this.video.nativeElement.srcObject = stream;
        this.video.nativeElement.play();
        this.video.nativeElement.addEventListener('playing', () => {
          const { offsetWidth, offsetHeight } = this.video.nativeElement;
          this.width = offsetWidth;
          this.height = offsetHeight;
          this.actions = true;
        });
      });
    }
  }
Capturing an image is handled by a separate function:
public capture() {
  this.displayStream = false;
  this.canvas.nativeElement.getContext('2d').drawImage(this.video.nativeElement, 0, 0, this.width, this.height);
  this.video.nativeElement.srcObject.getVideoTracks().forEach(track => track.stop());
}
Sharp-eyed readers may have noticed the
displayStreamclass member. It shows or hides the camera feed. There’s no reason to display it once a picture has been taken, and it can conditionally toggle the stream programmatically.
The last piece of functionality is the upload. We take the image currently on the canvas (the photo we just snapped) and upload it to Cloudinary via an HTTP post to https://api.cloudinary.com/v1_1/cloud_name/image/upload. Cloudinary accepts images in data-url format too.
  public usePhoto() {
  const capture = this.canvas.nativeElement.toDataURL('image/jpeg');
  const timeTaken = new Date().getTime();
  this.http.post(`https://api.cloudinary.com/v1_1/${environment.cloudName}/image/upload`, {
    file: capture,
    upload_preset: environment.uploadPreset
  }).subscribe((response: any) => {
    if (response) {
      this.captureCollectionRef.add({
        public_id: response.public_id,
        uploaded: timeTaken
      }).then(() => {
        this.router.navigateByUrl('/');
      });
    }
  });
}
At this point the “take picture and upload” functionality is complete.
Of course, you rarely nail the perfect shot on the first try, so we need a retake option. From a code perspective, it’s simple. We show the video stream again and display the control buttons:
public retakePhoto() {
  this.displayStream = true;
  this.actions = false;
  if (navigator.mediaDevices && navigator.mediaDevices.getUserMedia) {
    navigator.mediaDevices.getUserMedia(this.constraints).then(stream => {
      this.video.nativeElement.srcObject = stream;
      this.video.nativeElement.play();
      this.video.nativeElement.addEventListener('playing', () => {
        const { offsetWidth, offsetHeight } = this.video.nativeElement;
        this.width = offsetWidth;
        this.height = offsetHeight;
        this.actions = true;
      });
    });
  }
}
We also need to make sure that navigating away from this component kills the video stream. We can do that by finding all video tracks and stopping them. Angular’s ngOnDestroy hook is the right place for this:
ngOnDestroy() {
  this.actions = false;
  if (this.video) {
    this.video.nativeElement.srcObject.getVideoTracks().forEach(track => track.stop());
  }
}
Here’s what the “capture” component looks like:
Displaying the feed
The next piece is displaying the feed. So far, we’ve covered creating an image, uploading it to Cloudinary, and storing data about it in Firebase. Now it’s time to query that data and display it.
Open feed.component.html and add the following:
<h1>Selfie feed <span>📱 {{ '\uD83D\uDD25' }} {{ '\uD83D\uDE0E' }}</span></h1>
<mat-card
  class="spaced z-depth center"
  flex="50"
  *ngFor="let capture of captures$ | async"
>
  <cl-image public-id="{{ capture.public_id }}" mat-card-image>
    <cl-transformation
      width="450"
      height="450"
      gravity="faces"
      radius="max"
      crop="thumb"
      border="4px_solid_rgb:000"
      effect="improve"
    ></cl-transformation>
    <cl-transformation effect="sepia:90"></cl-transformation>
  </cl-image>
  <mat-card-content>
    <p>Uploaded at {{ capture.uploaded | date: 'full' }}</p>
  </mat-card-content>
  <mat-card-footer></mat-card-footer>
</mat-card>
Notice the <cl-image> element. That’s the Cloudinary Angular SDK in action, and the public-id attribute tells it which image to render. The <cl-transformation> elements apply transformations. Here’s what we’re doing:
- Setting width and height to 450 pixels
- Cropping the image as a thumbnail
- Adding a radius of ‘max’ (creating a circle)
- Applying gravity faces*
- Adding a sepia effect
*Wondering what gravity face(s) means? Cloudinary can find interesting parts of an image and focus on them. Specifying ‘face’ as a parameter to ‘gravity’ tells it to find a face and centre on it. Cloudinary calls this smart and content-aware image cropping.
For reference, here’s a screenshot of two images. The left one is the original; the right has all the transformations and optimisations applied.
![]()
With that knowledge, let’s look at the component logic. All we need to do is display the images users have taken. Every image stored in Firebase has two values: a public ID and an upload timestamp. We can query the dataset, return data in descending order by upload time, extract the public ID, and feed it to the Cloudinary Angular SDK:
import { AngularFirestore } from '@angular/fire/firestore';
import { Observable } from 'rxjs';
// ...
export class FeedComponent {
  captures$: Observable<any>;
  online: boolean;
  constructor(db: AngularFirestore) {
    const ref = db.collection('captures', (ref) =>
      ref.orderBy('uploaded', 'desc')
    );
    this.captures$ = ref.valueChanges();
  }
}
Believe it or not, that’s all the code we need. Take note of this.captures$ = ref.valueChanges(), which is an observable. Whenever a new value lands in Firebase, captures$ updates and the new image renders on screen.
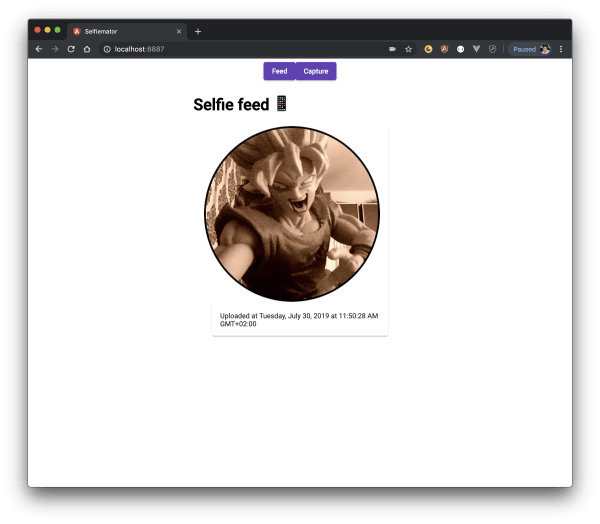
Here’s what the “feed” component looks like (notice the effects and transformations):
End of part one
We’ve built an application using Angular, Firebase, and Cloudinary that displays images taken with a laptop or mobile camera. At this point, the app isn’t a PWA yet. It can’t work offline, and it isn’t installable. There’s more to do, but we’ll cover that in the next article.