Filling in the Blanks: Teaching AI to Inpaint
I’ve been tinkering with model-building lately, and this time I wanted to tackle inpainting. The motivation came from Cloudinary’s inpainting feature, which I use regularly. I was curious about how the technique actually works under the hood.
What is inpainting?
Inpainting restores missing or corrupted parts of an image. The concept is dead simple. Consider a portrait-mode photo:
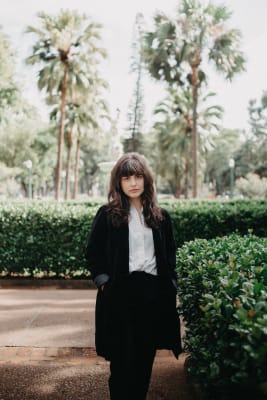
Trying to use this as a landscape poster (say, for promotional purposes) is going to hurt. The best you can do without AI is backfill the edges with the most dominant colour:

Note: the image above uses Cloudinary’s
b_auto, which detects the most dominant colour and backfills automatically.
Not great. How about this instead?
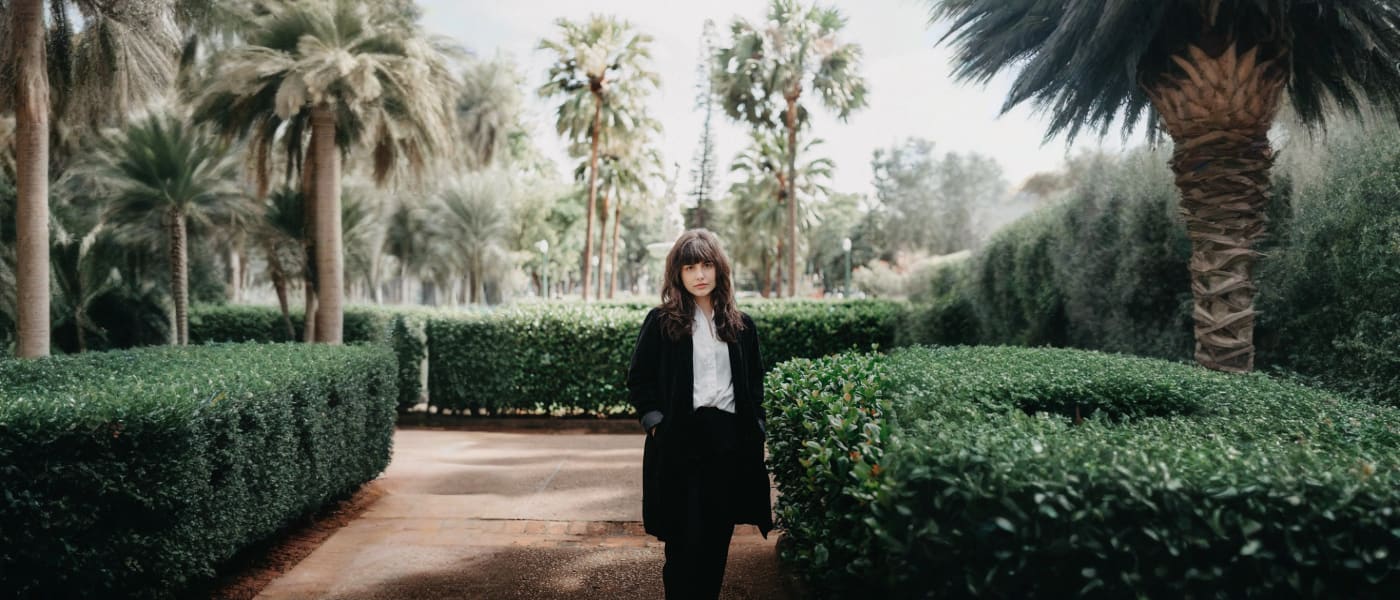
Much better. There are a few tell-tale signs of AI inpainting, but they’re negligible. The final result is miles ahead of a single-colour fill.
The real question: how does AI pull this off? And can we build something similar with TensorFlow?
How Does AI Learn to Inpaint?
We feed the model images with a block masked out (blacked out), alongside the original (the ground truth). Over many examples, it learns to fill in the blanks. It does this through neural networks.
The easiest way to think about neural networks: function approximators. They learn patterns in data by adjusting weights over time. Here, we want to approximate the mapping from a masked image to the original. For that, we use a special type of neural network called an autoencoder.
What is an autoencoder?
An autoencoder compresses input data (our images) into a smaller representation (encoding), then reconstructs the input from that smaller representation (decoding). Our goal: get the decoder to reconstruct the full image from its masked version.
An autoencoder doesn’t necessarily compress. Its purpose is to transform an input signal into a latent representation (encode), then reconstruct the original signal from that representation (decode). The design of the latent space can serve different functions:
- Using a smaller latent spatial size (smaller height and width) helps the model understand shapes and patterns over local pixel regions.
- Designing a compressed latent space enables the model to act like a traditional compression algorithm.
- Structuring the latent space with specific mathematical properties (such as a multivariate Gaussian) allows for sampling and generating new outputs from random noise (as in variational autoencoders).
We need layers of these autoencoders, and for that we need a Convolutional Neural Network (CNN). CNNs are built to work with images. Instead of connecting every pixel to every other pixel (far too slow), they use filters to scan the image. CNNs are excellent at identifying spatial hierarchies: edges that form shapes, shapes that form objects, objects that form scenes. They work with a sliding window operator (the “convolution”) using a small convolutional kernel trained to detect patterns, the same way filters work in classic computer vision. Think of someone scanning an image through a magnifying glass, spotting patterns in small regions and learning them.
Theory covered. Let’s see how it all comes together in code.
Code Walkthrough
Our model works with 32x32 grayscale images. We’ll use masks to black out parts of the image for the model to learn from. Instead of a sample dataset, we’ll generate our own synthetic data.
First, configure parameters: learning rate, epochs, and image dimensions.
const IMAGE_HEIGHT = 32;
const IMAGE_WIDTH = 32;
const IMAGE_CHANNELS = 1;

const NUM_TRAINING_SAMPLES = 1000;
const EPOCHS = 150;
const BATCH_SIZE = 8;
const LEARNING_RATE = 0.0005;
const MODEL_SAVE_PATH = 'file://./my-inpainting-model';
We’re training on 1000 32x32 pixel grayscale images. Epochs determines how many times we loop over the training set (how many full training iterations). The learning rate controls how big a step the model takes when adjusting. As the model learns, it makes predictions, checks how wrong it was (the loss), and tweaks its internal weights. A smaller learning rate helps the model converge more smoothly and reduces the risk of overshooting.
The best analogy I’ve come across: think of the learning rate as riding a rollercoaster. A slower descent (smaller learning rate) means you reach the bottom carefully. A faster one gets you there quicker, but you might overshoot the bottom entirely and bounce back up, missing the optimal point.
A learning rate that’s too small means the model learns painfully slowly (or gets stuck). Too large and it may miss the ideal training point entirely. You’re aiming for gradual, stable convergence. Expect to experiment; getting this right first time is rare.
Next, the inpainting model itself.
function createInpaintingModel(inputShape) {
  const model = tf.sequential();

  model.add(tf.layers.conv2d({
    inputShape: inputShape, filters: 32, kernelSize: 3, activation: 'relu', padding: 'same'
  }));
  model.add(tf.layers.maxPooling2d({ poolSize: 2, strides: 2 }));

  model.add(tf.layers.conv2d({
    filters: 64, kernelSize: 3, activation: 'relu', padding: 'same'
  }));
  model.add(tf.layers.maxPooling2d({ poolSize: 2, strides: 2 }));

  model.add(tf.layers.conv2d({
    filters: 128, kernelSize: 3, activation: 'relu', padding: 'same'
  }));
  model.add(tf.layers.maxPooling2d({ poolSize: 2, strides: 2 }));

  model.add(tf.layers.conv2dTranspose({
    filters: 128, kernelSize: 3, strides: 2, activation: 'relu', padding: 'same'
  }));

  model.add(tf.layers.conv2dTranspose({
    filters: 64, kernelSize: 3, strides: 2, activation: 'relu', padding: 'same'
  }));

  model.add(tf.layers.conv2dTranspose({
    filters: 32, kernelSize: 3, strides: 2, activation: 'relu', padding: 'same'
  }));

  model.add(tf.layers.conv2d({
    filters: inputShape[2], kernelSize: 3, activation: 'sigmoid', padding: 'same'
  }));

  model.compile({
    optimizer: tf.train.adam(LEARNING_RATE),
    loss: 'meanSquaredError'
  });
  model.summary();
  return model;
}
This is the convolutional autoencoder: an encoder paired with a decoder. conv2d detects features like edges or patterns. maxPooling2d shrinks the image while preserving the important bits. conv2dTranspose upsamples (grows) the image back to its original size. A final conv2d produces the output using a sigmoid activation to keep pixel values between 0 and 1.
conv2d uses a kernel size of 3, so each filter is a 3x3 “window” scanning the image. (padding: 'same' ensures the output size matches the input.)
maxPooling2d halves the image dimensions (from 32x32 down to 4x4 while increasing feature maps from 32 to 128), capturing more abstract features in less space.
The decoder reverses all of this using conv2dTranspose (from 4x4 back to 32x32).
We use the Adam optimiser with meanSquaredError as the loss function, which compares each pixel in the reconstructed output against the original. Large differences between output and input are penalised more heavily.
Loss measures how well the model “scores on a test”: lower is better. Mean Squared Error (MSE) calculates the average of the squared differences between predicted and actual values, for every pixel. In a loop it looks like:
Input image --> [Model] --> Predicted image --> [MSE Loss] --> Backpropagation --> Updated model. The model produces an output, gets told “your prediction was off by X amount”, adjusts its internal logic slightly to do better next time. This continues for all 150 epochs.
The next function generates synthetic training images: simple shapes created on the fly.
function generateSyntheticImage(height, width, channels) {
  return tf.tidy(() => {
    const canvas = tf.buffer([height, width, channels], 'float32');
    const backgroundColor = Math.random() * 0.3;
    for (let r = 0; r < height; r++) { for (let c = 0; c < width; c++) { canvas.set(backgroundColor, r, c, 0); } }

    const numShapes = Math.floor(Math.random() * 3) + 2;

    for (let i = 0; i < numShapes; i++) {
      const color = Math.random() * 0.7 + 0.3;

      const sh = Math.floor(Math.random() * (height / 1.8)) + 4;
      const sw = Math.floor(Math.random() * (width / 1.8)) + 4;
      const sr = Math.floor(Math.random() * (height - sh));
      const sc = Math.floor(Math.random() * (width - sw));
      for (let r = sr; r < sr + sh; r++) { for (let c = sc; c < sc + sw; c++) { if (r < height && c < width) { canvas.set(color, r, c, 0); } } }
    }
    return canvas.toTensor();
  });
}
Next, the masking function. This creates the blacked-out regions that simulate damage or missing parts.
function applyMask(originalTensor) {
  return tf.tidy(() => {
    const [height, width, channels] = originalTensor.shape;

    const minMaskDimRatio = 0.375;
    const maxMaskDimRatio = 0.75;

    const minH = Math.floor(height * minMaskDimRatio);
    const maxH = Math.floor(height * maxMaskDimRatio);
    const actualMaskHeight = Math.floor(Math.random() * (maxH - minH + 1)) + minH;

    const minW = Math.floor(width * minMaskDimRatio);
    const maxW = Math.floor(width * maxMaskDimRatio);
    const actualMaskWidth = Math.floor(Math.random() * (maxW - minW + 1)) + minW;

    const maskBuffer = tf.buffer([height, width, channels], 'float32');
    for (let r = 0; r < height; r++) { for (let c = 0; c < width; c++) { for (let ch = 0; ch < channels; ch++) { maskBuffer.set(1.0, r, c, ch); } } }

    const maskY = Math.floor(Math.random() * (height - actualMaskHeight));
    const maskX = Math.floor(Math.random() * (width - actualMaskWidth));

    for (let r = maskY; r < maskY + actualMaskHeight; r++) {
      for (let c = maskX; c < maskX + actualMaskWidth; c++) {
        for (let ch = 0; ch < channels; ch++) {
          maskBuffer.set(0.0, r, c, ch);
        }
      }
    }
    const maskTensor = maskBuffer.toTensor();
    return originalTensor.mul(maskTensor);
  });
}
Here’s what the original and masked images look like side by side (actual samples from the training set):
| Sample Type | Image |
|---|---|
| Original |  |
| Masked |  |
Why do this? The model needs paired examples to learn from. By masking out regions, we train it to predict what those missing parts should look like based on the surrounding context.
Next, the dataset generator creates all masked images and their original pairs.
function generateDataset(numSamples, height, width, channels) {
  const originalImagesArray = [];
  const maskedImagesArray = [];
  console.log('Generating synthetic training data...');
  for (let i = 0; i < numSamples; i++) {
    const originalTensor = generateSyntheticImage(height, width, channels);
    const maskedTensor = applyMask(originalTensor);
    originalImagesArray.push(originalTensor);
    maskedImagesArray.push(maskedTensor);
  }
  const originalImagesTensor = tf.stack(originalImagesArray);
  const maskedImagesTensor = tf.stack(maskedImagesArray);
  originalImagesArray.forEach(t => t.dispose());
  maskedImagesArray.forEach(t => t.dispose());
  return { originalImagesTensor, maskedImagesTensor };
}
This is what enables supervised learning: we provide inputs and the expected outputs.
Finally, the training and save function.
async function trainAndSaveModel(model, maskedImages, originalImages, epochs, batchSize, savePath) {
  console.log('\nStarting training...');
  await model.fit(maskedImages, originalImages, {
    epochs: epochs,
    batchSize: batchSize,
    shuffle: true,
    callbacks: {
      onEpochEnd: (epoch, logs) => {
        console.log(`Epoch ${epoch + 1}/${epochs} - Loss: ${logs.loss.toFixed(5)}`);
      }
    }
  });
  console.log('Training complete.');
  await model.save(savePath);
  console.log(`Model saved to ${savePath}`);
}
The .fit() method trains the model using [masked -> original] image pairs. We’re logging epochs and loss at each step. Once training completes, the model is saved to disk.
Here’s what the training output looks like:
All that’s left is to wire it up.
async function mainTrain() {
  const inputShape = [IMAGE_HEIGHT, IMAGE_WIDTH, IMAGE_CHANNELS];
  const model = createInpaintingModel(inputShape);

  const { originalImagesTensor, maskedImagesTensor } = generateDataset(
    NUM_TRAINING_SAMPLES, IMAGE_HEIGHT, IMAGE_WIDTH, IMAGE_CHANNELS
  );

  await trainAndSaveModel(model, maskedImagesTensor, originalImagesTensor, EPOCHS, BATCH_SIZE, MODEL_SAVE_PATH);

  originalImagesTensor.dispose();
  maskedImagesTensor.dispose();
  model.dispose();
  console.log(`TensorFlow.js backend: ${tf.getBackend()}, Tensors in memory after training: ${tf.memory().numTensors}`);
}

mainTrain().catch(console.error);
Depending on your machine’s resources, training takes anywhere from a few minutes up to about 20 minutes. Once it’s done, time to put the model to work.
Using the trained model
We need the same configuration, image generation, and masking functions from training (in practice, extract them to a shared file).
const IMAGE_HEIGHT = 32;
const IMAGE_WIDTH = 32;
const IMAGE_CHANNELS = 1;
const MODEL_LOAD_PATH = 'file://./my-inpainting-model/model.json';

function generateSyntheticImage(height, width, channels) {
  return tf.tidy(() => {
    const canvas = tf.buffer([height, width, channels], 'float32');
    const backgroundColor = Math.random() * 0.3;
    for (let r = 0; r < height; r++) { for (let c = 0; c < width; c++) { canvas.set(backgroundColor, r, c, 0); } }
    const numShapes = Math.floor(Math.random() * 3) + 2;
    for (let i = 0; i < numShapes; i++) {
      const color = Math.random() * 0.7 + 0.3;
      const sh = Math.floor(Math.random() * (height / 1.8)) + 4;
      const sw = Math.floor(Math.random() * (width / 1.8)) + 4;
      const sr = Math.floor(Math.random() * (height - sh));
      const sc = Math.floor(Math.random() * (width - sw));
      for (let r = sr; r < sr + sh; r++) { for (let c = sc; c < sc + sw; c++) { if (r < height && c < width) { canvas.set(color, r, c, 0); } } }
    }
    return canvas.toTensor();
  });
}

function applyMask(originalTensor) {
  return tf.tidy(() => {
    const [height, width, channels] = originalTensor.shape;
    const minMaskDimRatio = 0.375;
    const maxMaskDimRatio = 0.75;
    const minH = Math.floor(height * minMaskDimRatio);
    const maxH = Math.floor(height * maxMaskDimRatio);
    const actualMaskHeight = Math.floor(Math.random() * (maxH - minH + 1)) + minH;
    const minW = Math.floor(width * minMaskDimRatio);
    const maxW = Math.floor(width * maxMaskDimRatio);
    const actualMaskWidth = Math.floor(Math.random() * (maxW - minW + 1)) + minW;
    const maskBuffer = tf.buffer([height, width, channels], 'float32');
    for (let r = 0; r < height; r++) { for (let c = 0; c < width; c++) { for (let ch = 0; ch < channels; ch++) { maskBuffer.set(1.0, r, c, ch); } } }
    const maskY = Math.floor(Math.random() * (height - actualMaskHeight));
    const maskX = Math.floor(Math.random() * (width - actualMaskWidth));
    for (let r = maskY; r < maskY + actualMaskHeight; r++) {
      for (let c = maskX; c < maskX + actualMaskWidth; c++) {
        for (let ch = 0; ch < channels; ch++) {
          maskBuffer.set(0.0, r, c, ch);
        }
      }
    }
    const maskTensor = maskBuffer.toTensor();
    return originalTensor.mul(maskTensor);
  });
}
A function to convert tensors back to images.
async function tensorToImage(tensor, outputPath) {
  let imageTensor = tensor;
  if (tensor.rank === 4 && tensor.shape[0] === 1) {
    imageTensor = tensor.squeeze([0]);
  } else if (tensor.rank !== 3) {
    console.error(`tensorToImage expects a 3D tensor or a 4D tensor with batch size 1, but got rank ${tensor.rank}`);
    if (tensor !== imageTensor && !imageTensor.isDisposed) imageTensor.dispose();
    return;
  }
  const intTensor = tf.tidy(() => imageTensor.mul(255).asType('int32'));
  try {
    const pngData = await tf.node.encodePng(intTensor);
    fs.writeFileSync(outputPath, pngData);
    console.log(`Image saved to ${outputPath}`);
  } catch (error) {
    console.error(`Failed to save image to ${outputPath}:`, error);
  } finally {
    intTensor.dispose();
    if (tensor !== imageTensor && !imageTensor.isDisposed) imageTensor.dispose();
  }
}
Tensors are how TensorFlow represents data, but you can’t open them like regular image files. We multiply by 255 to scale values back to standard brightness levels, then save as png.
Now the fun part: seeing whether the model actually does what it’s supposed to.
async function mainInference() {
  console.log(`Attempting to load model from: ${MODEL_LOAD_PATH}`);
  let model;
  try {
    model = await tf.loadLayersModel(MODEL_LOAD_PATH);
    console.log('Model loaded successfully.');
    model.summary();
  } catch (error) {
    console.error('Failed to load the model:', error);
    console.error(`Please ensure the model exists at the specified path: ${MODEL_LOAD_PATH}`);
    console.error('You might need to run the updated train_inpainter.js script first (and delete any old model directory).');
    return;
  }

  console.log('\nPerforming inference on a new test sample...');
  const testOriginalTensor = generateSyntheticImage(IMAGE_HEIGHT, IMAGE_WIDTH, IMAGE_CHANNELS);
  const testMaskedTensor = applyMask(testOriginalTensor);

  const testMaskedBatched = testMaskedTensor.expandDims(0);
  const inpaintedTensorBatched = tf.tidy(() => model.predict(testMaskedBatched));

  await tensorToImage(testOriginalTensor, 'inference_original_v2.png');
  await tensorToImage(testMaskedTensor, 'inference_masked_input_v2.png');
  await tensorToImage(inpaintedTensorBatched, 'inference_inpainted_output_v2.png');

  console.log("\nInference complete. Check 'inference_*_v2.png' images.");

  testOriginalTensor.dispose();
  testMaskedTensor.dispose();
  testMaskedBatched.dispose();
  inpaintedTensorBatched.dispose();
  model.dispose();

  console.log(`TensorFlow.js backend: ${tf.getBackend()}, Tensors in memory after inference: ${tf.memory().numTensors}`);
}
We load the trained model, then create two tensors. testOriginalTensor is the correct input image. testMaskedTensor is the “damaged” version with the mask. If all goes well, the model should inpaint it.
A note on batching: the model was trained on batches. Even for a single image, it expects a 4D tensor ([BATCH_SIZE, 32, 32, 1] where 32 is the dimensions and 1 is grayscale). expandDims handles this, expanding the tensor shape from [32, 32, 1] to [1, 32, 32, 1] where the leading 1 means one image in the batch.
The magic happens inside model.predict(), where the model receives the masked image and attempts to reconstruct it. All images are saved as png files.
Here’s the inference output:
Let’s see how well the model performed:
| Type | Image |
|---|---|
| Original Image |  |
| Masked Input |  |
| Inpainted Output |  |
Not bad for a model we built and trained in minutes on a local machine. The example from the beginning (where the image was backfilled with flora and fauna) uses a similar architecture trained on a vastly larger dataset to recognise all sorts of patterns. What we’ve built here is a stripped-back version of the same concept.
Conclusion
This project started with a simple goal: teach a small AI model to fill in masked-out parts of an image.
As web developers, we often treat AI as an intimidating black box, especially for visual tasks like image generation or restoration. But by building a small inpainting model with TensorFlow.js, we punched through that barrier. No giant dataset. No GPU cluster. No PhD. Just JavaScript, a handful of synthetic images, and a willingness to experiment.
Along the way, we covered:
- Convolutional Neural Networks (CNNs) and why they’re suited to image work
- Autoencoders, and how they encode and decode (reconstruct) data
- The role of loss functions and optimisers in model learning
- How to prepare data, handle tensors, and train a model in TensorFlow.js
- Why input shape matching and batching matter, even when predicting a single image
We built a system to visualise our model’s performance, saving images that show exactly how well (or how poorly) it handled image repair.
Whether you’re curious about generative AI, looking to build smarter tools, or just want to experiment, this kind of hands-on tinkering is the right first step. Start small. Stay visual. Every pixel you generate, mask, or restore teaches you something fundamental about how machines learn.