MCP Servers - The Bridge Between LLMs and Real-World Tools
If you’ve spent any time wiring large language models into real systems (querying APIs, triggering workflows, touching files), you know the result: a mess of fragile glue code and bespoke wrappers.
Model Context Protocol (MCP) is one of the most promising efforts to fix that.
It provides a structured, tool-agnostic way for language models to interact with external tools and resources. At the centre of it all sits the MCP server, the part of your application that exposes tools and context to the LLM.
What is an MCP Server?
An MCP server is a standalone process that acts as a context provider for LLMs. It exposes three types of functionality:
- Tools – callable functions (like
getWeather,searchDocs,sendEmail) - Resources – File-like data that can be read by clients (like API responses or file contents)
- Prompts – reusable natural language prompt templates that help users to achieve tasks
It communicates with the LLM runtime (client) using JSON-RPC, either over stdio, HTTP(S), or Server-Sent Events (SSE). The LLM discovers what capabilities are available, invokes them with structured arguments and receives structured responses to carry on the conversation.
A single MCP server can register multiple tools, and those tools can persist state across calls. Perfect for orchestrating multi-step workflows.
A Typical Call Flow
Here’s the standard lifecycle, stripped back:
- The MCP client starts and connects to your (MCP) server.
- It sends a
listToolscall to discover what’s available. - Based on the tool list, it picks one and sends a structured invocation (triggered when the input to the LLM touches a topic that requires a tool call).
- Your server executes the function, then responds with a result.
Anatomy of an MCP Server
At a code level, an MCP server is mostly just:
- A schema definition (tools, resources, prompts)
- A dispatcher that routes incoming method calls
- A set of resolvers or handlers for each tool/resource
Why This Matters
The LLM stops being a chat interface. It becomes a controller that orchestrates real systems.
With an MCP server, you can expose:
- Your file system for editing or summarising docs
- APIs for customer data, analytics, payments
- Third-party integrations (Slack, Notion, GitHub, Postgres)
- UI-driven flows like form filling or test automation
And because MCP is model-agnostic, it works with anything that understands the protocol: Claude, Gemini, LLaMA, you name it.
Sample implementation
Let’s look at an MPC server that communicates over stdio and registers multiple tools for querying the Star Wars API. This is a very classic pattern. A lot of MCP servers are just wrappers bolted on top of existing APIs. That’s the real power here: these APIs can now be consumed easily by any large language model.
Module imports
import { McpServer } from '@modelcontextprotocol/sdk/server/mcp.js';
import { StdioServerTransport } from '@modelcontextprotocol/sdk/server/stdio.js';
import { z } from 'zod';
Three imports at the top. McpServer is the main class for defining and managing the server. StdioServerTransport provides a transport mechanism for communicating via standard input/output (useful for local CLI tools or desktop LLM apps). zod handles schema validation for structured tool input types.
Defining the API Base URL
const BASE_URL = 'https://swapi-api.hbtn.io/api';The BASE_URL constant stores the root URL of the Star Wars API. All API requests in this server build from this base.
Main Server Entry Point
async function main() {
  const server = new McpServer({
    name: 'swapi-server',
    version: '1.0.0',
  });
We define an asynchronous main() function as the server’s entry point. Inside it, we create a new McpServer instance, passing in basic metadata like name and version. This metadata helps identify the server to clients.
Helper Function for Resource Fetching
async function fetchFirst(resource: string, queryKey: string, queryVal: string) {
  const url = `${BASE_URL}/${resource}/?${queryKey}=${encodeURIComponent(queryVal)}`;
  const res = await fetch(url);
  const json = await res.json();
  const results: any[] = Array.isArray(json.results) ? json.results : [];
  return results.length > 0
    ? results[0]
    : { error: `No ${resource.slice(0, -1)} found for "${queryVal}"` };
}
The fetchFirst function abstracts the SWAPI query logic. It builds a search URL based on a resource type (like people or starships), fires off a fetch request and returns the first result. If nothing comes back, it returns an error object.
Registering the getCharacter Tool
server.registerTool(
  'getCharacter',
  {
    title: 'Get Star Wars Character',
    description: 'Fetch a character by name',
    inputSchema: {
      name: z.string().describe("Character name, e.g. 'Han Solo'"),
    },
  },
  async (args) => {
    const data = await fetchFirst('people', 'search', args.name);
    return {
      content: [{ type: 'text', text: JSON.stringify(data, null, 2) }],
    };
  },
);
Here we register our first tool, getCharacter. It has a title and description that an LLM can use to understand its purpose. The input schema defines a single string field called name, using Zod. When called, the handler searches the people resource and returns the result as a formatted text block.
This is the key part. This function (and all subsequent ones) are the tools available to the LLM, registered with registerTool. Think of them as wrappers around the API; we’ve now exposed the functionality to the model.
Registering Other Similar Tools
The same pattern repeats for other Star Wars data types. Each tool has a similar input schema and handler calling fetchFirst. The input schema specifies what arguments the tool expects (a 1:1 mapping to the API parameters).
server.registerTool(
  'getStarship',
  {
    title: 'Get Star Wars Starship',
    description: 'Fetch a starship by name',
    inputSchema: {
      name: z.string().describe("Starship name, e.g. 'Millennium Falcon'"),
    },
  },
  async (args) => {
    const data = await fetchFirst('starships', 'search', args.name);
    return {
      content: [{ type: 'text', text: JSON.stringify(data, null, 2) }],
    };
  },
);

server.registerTool(
    'getPlanet',
    {
      title: 'Get Star Wars Planet',
      description: 'Fetch a planet by name',
      inputSchema: {
        name: z.string().describe("Planet name, e.g. 'Tatooine'"),
      },
    },
    async (args) => {
      const data = await fetchFirst('planets', 'search', args.name);
      return {
        content: [{ type: 'text', text: JSON.stringify(data, null, 2) }],
      };
    },
  );

 server.registerTool(
    'getFilm',
    {
      title: 'Get Star Wars Film',
      description: 'Fetch a film by title',
      inputSchema: {
        title: z.string().describe("Film title, e.g. 'A New Hope'"),
      },
    },
    async (args) => {
      const data = await fetchFirst('films', 'search', args.title);
      return {
        content: [{ type: 'text', text: JSON.stringify(data, null, 2) }],
      };
    },
  );

   server.registerTool(
     'getSpecies',
     {
       title: 'Get Star Wars Species',
       description: 'Fetch a species by name',
       inputSchema: {
         name: z.string().describe("Species name, e.g. 'Wookiee'"),
       },
     },
     async (args) => {
       const data = await fetchFirst('species', 'search', args.name);
       return { content: [{ type: 'text', text: JSON.stringify(data, null, 2) }] };
     },
   );

  server.registerTool(
    'getVehicle',
    {
      title: 'Get Star Wars Vehicle',
      description: 'Fetch a vehicle by name',
      inputSchema: {
        name: z.string().describe("Vehicle name, e.g. 'Sand Crawler'"),
      },
    },
    async (args) => {
      const data = await fetchFirst('vehicles', 'search', args.name);
      return { content: [{ type: 'text', text: JSON.stringify(data, null, 2) }] };
    },
  );

  server.registerTool(
    'searchResource',
    {
      title: 'Search SWAPI Resource',
      description: 'Generic search by resource type and query',
      inputSchema: {
        resource: z
          .enum(['people', 'starships', 'planets', 'films', 'species', 'vehicles'])
          .describe('One of: people, starships, planets, films, species, vehicles'),
        query: z.string().describe('Search term'),
      },
    },
    async (args) => {
      const { resource, query } = args as { resource: string; query: string };
      const url = `${BASE_URL}/${resource}/?search=${encodeURIComponent(query)}`;
      const res = await fetch(url);
      const json = await res.json();
      return {
        content: [{ type: 'text', text: JSON.stringify(json.results || [], null, 2) }],
      };
    },
  );
Setting Up stdio Transport
const transport = new StdioServerTransport();
await server.connect(transport);
console.error('✅ SWAPI MCP server (full toolkit) running over STDIO');
To expose the server to a client, we create a StdioServerTransport and call connect() on the MCP server instance. This sets up the full event loop and listens for incoming tool invocations via standard input.
Running the Server
All that’s left is calling main() to start the server.
Debugging
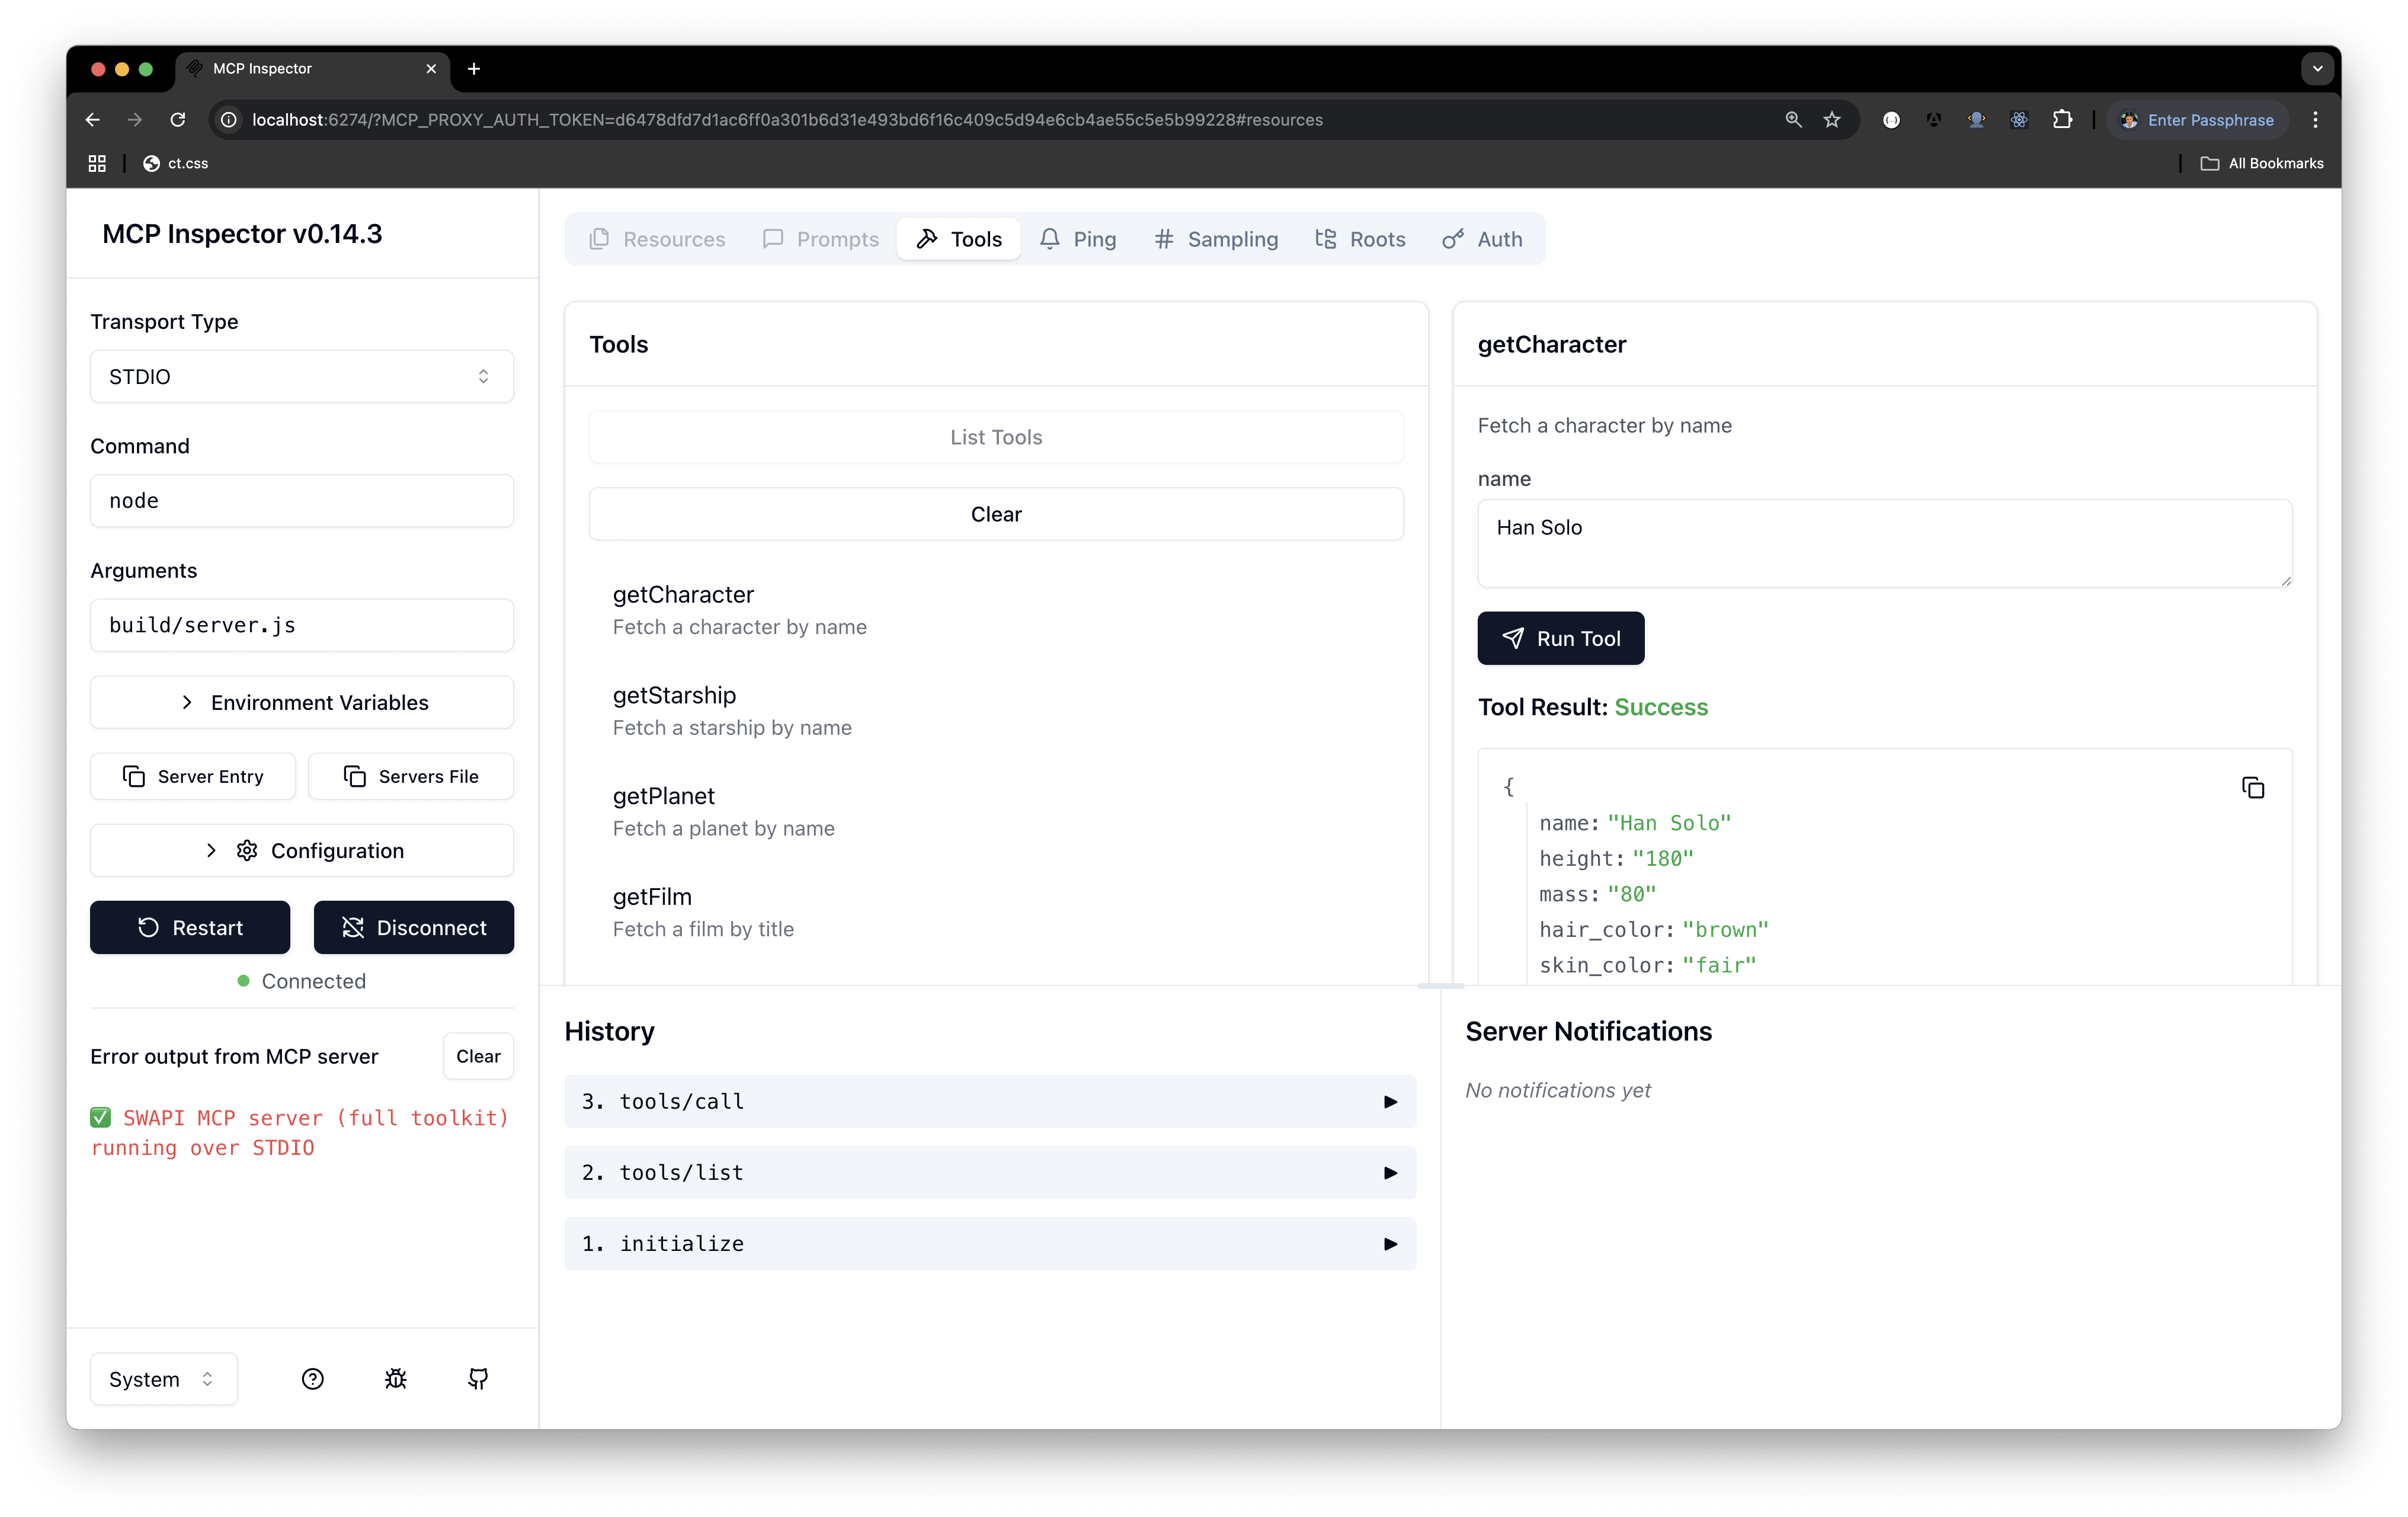
We’ll cover using this server from an MCP client (one we’ll write ourselves) in an upcoming article. For now, we should be able to run the server locally and test it. There’s an inspector tool that does exactly this.
Run npx @modelcontextprotocol/inspector node build/server.js (make sure build/server.js exists). Copy the URL it returns and paste it into your browser.
The result should look something like the screenshot below. Notice the “list tools” button; clicking it reveals all available tools. You can test them with sample arguments and observe the results.
Wrap-up
MCP servers turn language models from passive text generators into active, stateful agents that work with your tools and data. The real power: you can wrap your existing APIs and SDKs, then expose them to the model. Exactly what we did with the Star Wars API.