Watch the Past Move: Animating Historic Photos with Gemini and Veo
Take a dusty old black-and-white photograph and watch it come to life. People walking. Vehicles rolling past. Wind stirring through the trees. Two API calls and a bit of prompt engineering is all it takes.
This is a Node.js pipeline that takes an old photograph, colourises it with Gemini’s image generation model, and animates it into an 8-second video with Google’s Veo 3.1. The whole thing runs from the terminal and spits out an MP4.
The idea
The pipeline boils down to 4 steps:
- You point the script at any photograph on disk.
- Gemini colourises it (if it’s black-and-white).
- Veo 3.1 animates the colourised image into a video.
- The video is saved as an MP4.
Two API calls do the heavy lifting. Everything else is just file handling.
Setting things up
Dependencies are minimal. You need the Google GenAI SDK, mime for content type detection, and sharp for image analysis.
{
  "type": "module",
  "dependencies": {
    "@google/genai": "^1.0.0",
    "mime": "^4.1.0",
    "sharp": "^0.33.0"
  }
}
You’ll also need a Gemini API key set as the GEMINI_API_KEY environment variable. The entry point starts by initialising the client and asking the user for an image path.
import { GoogleGenAI } from "@google/genai";
import { createInterface } from "readline";
import { existsSync } from "fs";
import { resolve, parse } from "path";
import { homedir } from "os";

const client = new GoogleGenAI({ apiKey: process.env.GEMINI_API_KEY });
The script prompts for a file path, resolves it (including ~ expansion), and checks the file actually exists. Nothing fancy. Just enough to avoid cryptic errors later on.
Step 1: Detecting greyscale and colourising
Most historic photographs are black-and-white or sepia. Feeding a greyscale image directly into a video model produces greyscale video (fine, but far less striking). So the first step is to colourise it, but only if it actually needs it.
Greyscale detection with sharp
Before reaching for an LLM, we can determine whether an image has colour using sharp and some basic pixel maths. No need to burn an API call for something a few lines of image analysis can handle.
The approach: shrink the image to a small thumbnail, extract raw RGB values, and calculate the HSL saturation of each pixel. If almost no pixels have meaningful saturation, the image is greyscale.
import sharp from "sharp";

async function isGreyscale(input, opts = {}) {
  const {
    sampleSize = 150,
    saturationThreshold = 0.12,
    colourRatio = 0.04,
  } = opts;

  const metadata = await sharp(input).metadata();

  if (metadata.channels === 1 || metadata.space === "b-w") {
    return { greyscale: true, colourPixelPct: 0, avgSaturation: 0, method: "native" };
  }

  const { data } = await sharp(input)
    .resize(sampleSize, sampleSize, { fit: "fill" })
    .removeAlpha()
    .raw()
    .toBuffer({ resolveWithObject: true });

  const totalPixels = data.length / 3;
  let colourPixels = 0;
  let saturationSum = 0;

  for (let i = 0; i < data.length; i += 3) {
    const r = data[i], g = data[i + 1], b = data[i + 2];
    const max = Math.max(r, g, b);
    const min = Math.min(r, g, b);
    const lightness = (max + min) / 2;

    let saturation;
    if (max === min) saturation = 0;
    else if (lightness > 127) saturation = (max - min) / (510 - max - min);
    else saturation = (max - min) / (max + min);

    saturationSum += saturation;
    if (saturation > saturationThreshold) colourPixels++;
  }

  return {
    greyscale: colourPixels / totalPixels < colourRatio,
    colourPixelPct: Math.round((colourPixels / totalPixels) * 10000) / 100,
    avgSaturation: Math.round((saturationSum / totalPixels) * 10000) / 10000,
    method: "sampled",
  };
}
This handles true greyscale, sepia, cyanotype, and other tinted monochrome images. The saturationThreshold of 0.12 means a pixel needs meaningful colour saturation to count. And colourRatio of 0.04 means up to 4% of pixels can be “colourful” (noise, compression artefacts) before we declare the image is in colour. The whole check takes milliseconds.
Colourising with Gemini
If the image is already in colour, the pipeline skips straight to animation. If it’s greyscale, we send it to gemini-3-pro-image-preview with both IMAGE and TEXT response modalities for colourisation.
const result = await isGreyscale(imagePath);

if (!result.greyscale) {
  console.log("Image is already in colour, skipping colorization.");
  return imagePath;
}

const response = await client.models.generateContentStream({
  model: "gemini-3-pro-image-preview",
  config: {
    responseModalities: ["IMAGE", "TEXT"],
  },
  contents: [
    {
      role: "user",
      parts: [
        { inlineData: { mimeType, data: base64Image } },
        {
          text: "Colorize this black-and-white or grayscale image with historically accurate, natural colors. Do not alter composition, content, or details.",
        },
      ],
    },
  ],
});
Since we already know the image is greyscale, the prompt is simpler. No conditional “if black-and-white” hedging needed. The response is streamed, and the first image part that comes back is saved to disk as {original_name}_colorized.png.
for await (const chunk of response) {
  const parts = chunk.candidates?.[0]?.content?.parts;
  if (!parts) continue;
  for (const part of parts) {
    if (part.inlineData) {
      const buffer = Buffer.from(part.inlineData.data, "base64");
      fs.writeFileSync(outputPath, buffer);
      return outputPath;
    }
  }
}
This is arguably the most impressive step visually. A faded black-and-white photograph suddenly has blue skies, brown brick, green foliage, and period-appropriate clothing colours. Gemini does a remarkably good job of inferring what colours things should be based on context alone.
Step 2: Crafting the animation prompt
Here’s where most of the real effort goes. Simply asking a video model to “animate this image” tends to produce bizarre results: faces morphing, buildings warping, physics breaking down entirely. The prompt needs to be very specific about what should move and how.
const prompt =  `Bring this photograph to life with realistic motion and animation.
  Animate the subjects and scene naturally - people move, vehicles drive, objects interact - as if this were a real moment captured on film that keeps playing.
  All movement must obey the physical constraints visible in the image: vehicles follow roads, rails, and paths exactly as laid out; people walk on sidewalks and streets; nothing moves through walls, buildings, or off established paths.
  Shadows, light patches, and dark areas on the ground are lighting effects only - they are not roads, turns, or paths and must not influence the direction of any moving object.
  Preserve the exact appearance and identity of every person, object, and setting: faces, clothing, colors, vehicle designs, and background details must look identical to the source image.
  Human faces should allow subtle, natural micro-movements - gentle eye blinks, very slight shifts in gaze, and minimal natural muscle tension - to avoid a stiff, mannequin-like appearance. However, do not change facial expressions dramatically: no wide smiles, no mouth opening, no exaggerated emotion shifts. The goal is lifelike stillness, not frozen plastic. Preserve each person's identity and likeness exactly as in the source image.
  Add environmental motion too: wind, light, atmosphere.
  While adding environmental sounds, do not add human speech to the video.
  CRITICAL: Do not introduce, generate, or hallucinate any new people, figures, characters, or objects that are not already visible in the source image. The number of people and objects must remain exactly the same throughout the entire video. No one should appear from off-screen, materialize, or fade into existence.
  Do not change, add, or remove anything from the scene - only animate what is already there.`
A few things worth calling out:
- Physical constraints are explicitly stated. Without this, vehicles tend to drive off roads and people walk straight through walls.
- Shadows get their own instruction because the model sometimes interprets dark patches on the ground as paths and sends vehicles veering into them.
- Face handling is deliberately conservative. The prompt asks for subtle micro-movements (blinks, tiny gaze shifts) but explicitly prohibits dramatic expression changes. Without this guardrail, people in old photos tend to suddenly grin or open their mouths (deeply unsettling).
- No phantom people is a hard lesson learned. Without an explicit instruction, Veo occasionally hallucinates new figures into the scene; a person materialising mid-frame out of nowhere. The
CRITICALinstruction hammers home that the number of people and objects must stay constant. No one appears from off-screen, fades in, or spawns out of thin air. - Preservation gets hammered home repeatedly. The model should animate what’s already there, not conjure up new elements or alter existing ones.
Step 3: Generating the video
The colourised image and the prompt are sent to Veo 3.1’s video generation endpoint. The video is set to 8 seconds.
const imageData = fs.readFileSync(imagePath);
const base64Image = imageData.toString("base64");
const mimeType = imagePath.endsWith(".png") ? "image/png" : "image/jpeg";

const operation = await client.models.generateVideos({
  model: "veo-3.1-generate-preview",
  prompt,
  image: {
    imageBytes: base64Image,
    mimeType,
  },
  config: { durationSeconds: 8 },
});
Video generation is asynchronous. The API returns an operation object that you poll until operation.done is true.
while (!operation.done) {
  await sleep(10000);
  operation = await client.operations.getVideosOperation({ operation });
}
This typically takes anywhere from 30 seconds to a couple of minutes depending on server load. Once it’s done, the video URI is extracted from the response and downloaded to disk.
const video = operation.response?.generatedVideos?.[0];
await client.files.download({
  file: video.video,
  downloadPath: outputFile,
});
The output filename is derived from the original image name, so old_photo.jpg becomes old_photo.mp4.
The full pipeline
Click Run to see the full pipeline in action:
The whole thing takes roughly 1-2 minutes. Most of that is Veo rendering.
Examples
Here are some results I’ve been particularly pleased with. Note that videos also contain sound effects! Make sure to turn up your volume!
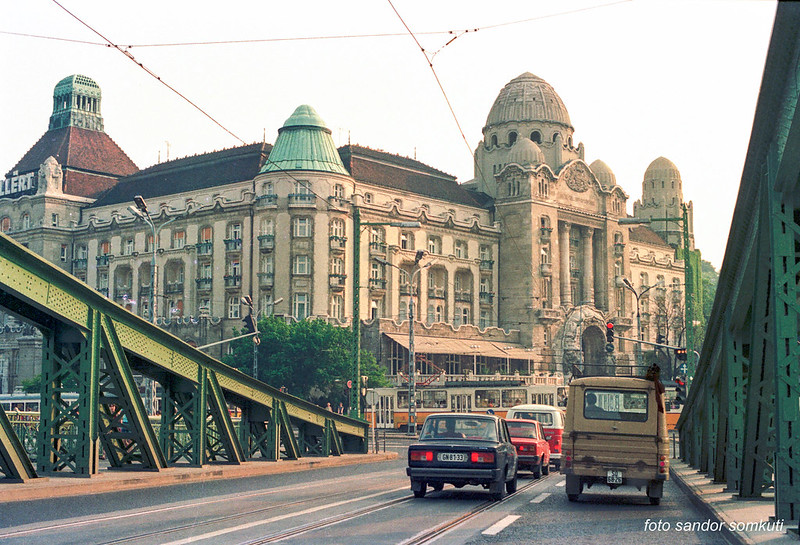
Budapest in 1980s
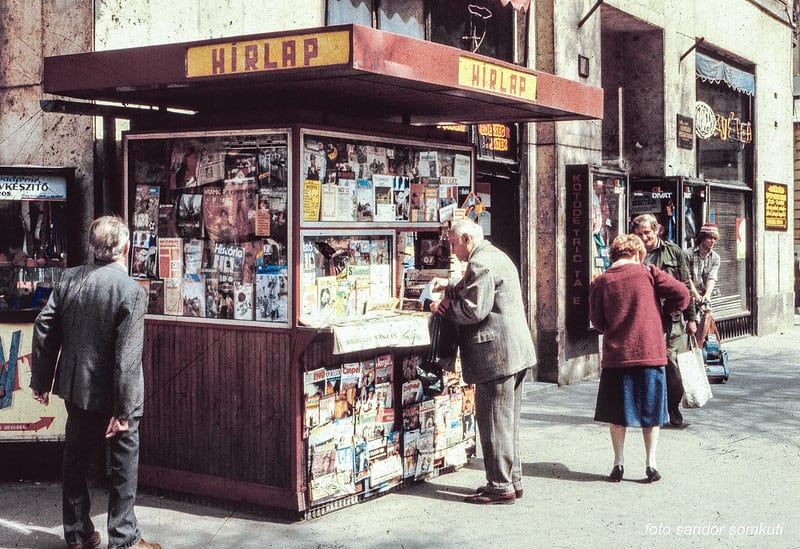
Budapest in 1980s
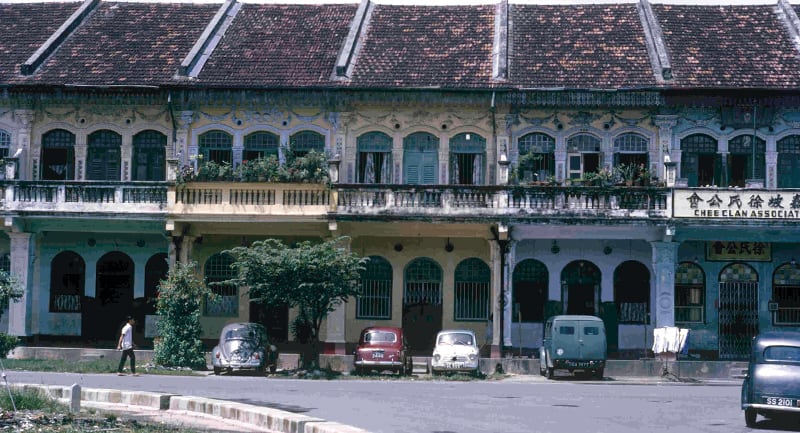
Singapore in 1966
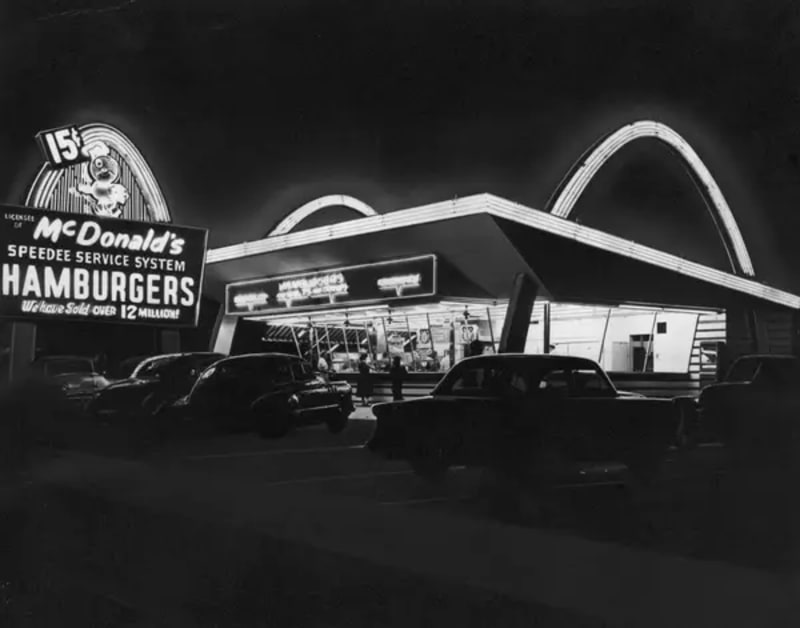
First McDonalds 1955 (Des Plaines, IL)
All the original images belong to their respective owners - https://rarehistoricalphotos.com/budapest-photos-1980s/, https://www.lionheartlanders.com/post/old-photographs-of-singapore-preserving-our-island-s-visual-heritage, https://rarehistoricalphotos.com/mcdonalds-old-photos/
Wrapping up
What strikes me most about this project is how just two API calls can produce something that feels genuinely magical. The colourisation step transforms a flat, grey image into something vibrant and believable. And the animation step takes that still moment and lets it breathe. People shift their weight. Leaves rustle. Light dances across water.
The prompt engineering matters more than you’d expect. Without those explicit constraints around physics, shadows, and facial expressions, the results veer into uncanny valley territory fast. With them, you get something that looks like recovered footage rather than AI-generated content.
So give it a go. Dig out an old family photo, a postcard from a flea market, or a historical image from your local archive. Point the script at it and watch history come to life.