Creating memes with Cloudinary
The internet loves memes. Memes love the internet. Creating, sharing and laughing at them is something most of us have done at some point. Recently a new, viral meme landed: the Dolly Parton challenge.
If you are not familiar with Dolly Parton listen to one of her most popular songs according to Billboard on YouTube
The whole thing started with an Instagram post from Dolly Parton herself, who shared the post below.
View this post on Instagram > Get you a woman who can do it all 😉
A post shared by Dolly Parton (@dollyparton) on Jan 21, 2020 at 10:02am PST
The post is a collage of 4 images, each showing a different persona for a different social media channel. On LinkedIn, we all want to seem professional. On Facebook, we’re showing our cool side. On Instagram, we try to be hip. And on Tinder… well, you know. “Attractive.”
Memes via URL manipulation
Plenty of tools exist for creating memes online. But here we’ll take an approach that uses Cloudinary and builds a meme for the Dolly Parton challenge just by manipulating an image URL.
To get started, I’ve uploaded the following four images of Mark Hamill to Cloudinary:


Adding a text overlay
Cloudinary lets us create overlays (overlaying images) and add text to images.
Let’s tackle the text overlay first. To add a text overlay to the first image, we specify the l_text option followed by some options like font size, style and family: “
Let’s try this on the first image:
https://res.cloudinary.com/tamas-demo/image/upload/f_auto,q_auto,w_250/l_text:Impact_60_stroke:LINKEDIN/mark-hamill-1.jpg
That looks okay, but we could do with a different font colour and a different position for the text. For positioning, we can use gravity, which in our case will be south since we want the text at the bottom (co_white sets the font colour): l_text:Impact_60_stroke:LINKEDIN,co_white,g_south
https://res.cloudinary.com/tamas-demo/image/upload/f_auto,q_auto,w_250/l_text:Impact_60_stroke:LINKEDIN,co_white,g_south/mark-hamill-1.jpg
Exactly what we wanted.
Creating a collage
Now the tricky bit. How do we create a collage of 4 images in a 2x2 grid? Think of the grid as layers. Just like we positioned text within a single image, we can add three more layers where each layer is an image with its own text overlay.
We need to work out the position for each image, but that’s straightforward enough. The text layer for each image looks like this: l_text:Impact_60_stroke:FACEBOOK,co_white,g_south.
We also need to make the images the same size, which we can do with the w, h and crop parameters: w_250,h_250,c_fill.
For further resizing and crop options, please check the Cloudinary docs.
Putting this together, we now have: w_250,h_250,c_fill/l_text:Impact_60_stroke:LINKEDIN,co_white,g_south for each image.
To understand the grid system, take a look at this drawing:
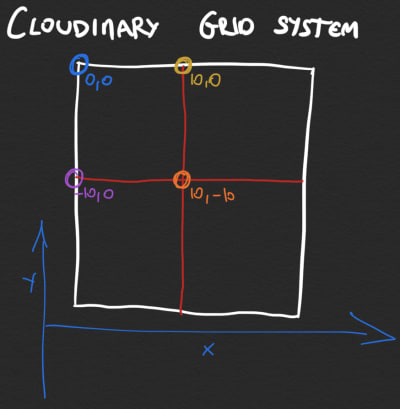
Each image has a position, so we need to stitch them together with that in mind. The first image sits at location “0, 0”, while the next one goes at “250, 0” because the first image has a width of 250.
Here’s how that looks in the options: w_250,h_250,c_fill/l_text:Impact_60_stroke:LINKEDIN,co_white,g_south/x_250,l_mark-hamill-2/l_text:Impact_60_stroke:FACEBOOK,co_white,g_south/
Notice x_250,l_mark-hamill-2. That’s the key. We’re placing the second image on the x-axis, 250 pixels from the starting point. We can now apply resizing and crop options to this image too. We also need to shift the next text overlay, so an x_125 option gets added for the text.
All together, we’re at:
https://res.cloudinary.com/tamas-demo/image/upload/f_auto,q_auto,w_250/l_text:Impact_60_stroke:LINKEDIN,co_white,g_south/x_250,l_mark-hamill-2,w_250,c_fill/l_text:Impact_60_stroke:FACEBOOK,co_white,g_south,x_125/mark-hamill-1.jpg
Not bad. Now let’s add the remaining two images using the same approach. Remember to resize each image and position the text overlay using the x and y axis (with a negative value when necessary), and do the maths for positioning. Keep adjusting until you land here:
https://res.cloudinary.com/tamas-demo/image/upload/q_auto,f_auto/c_fill,w_250,h_250/l_text:Impact_60_stroke:LINKEDIN,co_white,g_south/c_fill,l_mark-hamill-2,w_250,h_250,x_250/l_text:Impact_60_stroke:FACEBOOK,co_white,g_south,x_125/c_fill,l_mark-hamill-3,w_250,h_250,x_-125,y_250/l_text:Impact_60_stroke:INSTAGRAM,co_white,g_south,x_-125/c_fill,l_mark-hamill-4,w_250,h_250,x_125,y_125/l_text:Impact_60_stroke:TINDER,co_white,g_south,x_125/bo_5px_solid_white/mark-hamill-1
The result isn’t perfect. The Instagram text is clearly too large, so we could either increase the image size or decrease the font size. Let’s go with bumping up the size values and making some positioning adjustments:
https://res.cloudinary.com/tamas-demo/image/upload/q_auto,f_auto/c_fill,w_300,h_300/l_text:Impact_60_stroke:LINKEDIN,co_white,g_south/c_fill,l_mark-hamill-2,w_300,h_300,x_300/l_text:Impact_60_stroke:FACEBOOK,co_white,g_south,x_150/c_fill,l_mark-hamill-3,w_300,h_300,x_-150,y_300/l_text:Impact_60_stroke:INSTAGRAM,co_white,g_south,x_-150/c_fill,l_mark-hamill-4,w_300,h_300,x_150,y_150/l_text:Impact_60_stroke:TINDER,co_white,g_south,x_150/mark-hamill-1
Now let’s add some final touches. Since the text is also a layer, we can nudge its position. It’s sitting too low, so we add a small vertical offset with y_10: l_text:Impact_60_stroke:LINKEDIN,co_white,g_south,y_10.
https://res.cloudinary.com/tamas-demo/image/upload/q_auto,f_auto/c_fill,w_300,h_300/l_text:Impact_60_stroke:LINKEDIN,co_white,g_south,y_10/c_fill,l_mark-hamill-2,w_300,h_300,x_300/l_text:Impact_60_stroke:FACEBOOK,co_white,g_south,x_150,y_10/c_fill,l_mark-hamill-3,w_300,h_300,x_-150,y_300/l_text:Impact_60_stroke:INSTAGRAM,co_white,g_south,x_-150,y_10/c_fill,l_mark-hamill-4,w_300,h_300,x_150,y_150/l_text:Impact_60_stroke:TINDER,co_white,g_south,x_150,y_10/mark-hamill-1
Much less congested now.
Finding a face
Using c_fill as the crop option doesn’t always work well. Look at the LinkedIn photo: Mark’s head has been cut off in an odd way (and the other images aren’t much better). Cloudinary has an option called g_face which allows cropping based on face detection.
All we need to do is apply g_face to the images we want:
https://res.cloudinary.com/tamas-demo/image/upload/q_auto,f_auto/g_face,c_fill,w_300,h_300/l_text:Impact_60_stroke:LINKEDIN,co_white,g_south,y_10/c_fill,l_mark-hamill-2,w_300,h_300,x_300/l_text:Impact_60_stroke:FACEBOOK,co_white,g_south,x_150,y_10/c_fill,l_mark-hamill-3,w_300,h_300,x_-150,y_300/l_text:Impact_60_stroke:INSTAGRAM,co_white,g_south,x_-150,y_10/c_fill,l_mark-hamill-4,w_300,h_300,x_150,y_150/l_text:Impact_60_stroke:TINDER,co_white,g_south,x_150,y_10/mark-hamill-1
Adding a border
One last touch: drawing a border around the image. We can do that by adding bo_3px_solid_white to the image layers, where bo is short for “border” and the rest controls the border itself. Here’s the final result:
https://res.cloudinary.com/tamas-demo/image/upload/q_auto,f_auto/bo_3px_solid_white,c_fill,w_300,h_300,g_face/l_text:Impact_60_stroke:LINKEDIN,co_white,g_south,y_10/bo_3px_solid_white,c_fill,l_mark-hamill-2,w_300,h_300,x_300/l_text:Impact_60_stroke:FACEBOOK,co_white,g_south,x_150,y_10/bo_3px_solid_white,c_fill,l_mark-hamill-3,w_300,h_300,x_-150,y_300/l_text:Impact_60_stroke:INSTAGRAM,co_white,g_south,x_-150,y_10/bo_3px_solid_white,c_fill,l_mark-hamill-4,w_300,h_300,x_150,y_150/l_text:Impact_60_stroke:TINDER,co_white,g_south,x_150,y_10/mark-hamill-1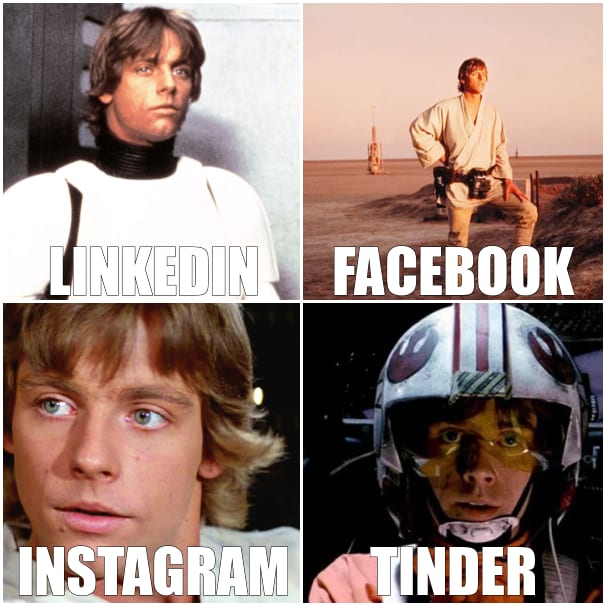
Take it to the next level
Let’s look at another example, keeping the Star Wars spirit. What if a stormtrooper wanted to do this meme? It’d be a bit boring since they all look the same:
https://res.cloudinary.com/tamas-demo/image/upload/q_auto,f_auto/bo_3px_solid_white,c_fill,w_300,h_300,g_face/l_text:Impact_60_stroke:LINKEDIN,co_white,g_south,y_10/bo_3px_solid_white,c_fill,l_stormtrooper,w_300,h_300,x_300/l_text:Impact_60_stroke:FACEBOOK,co_white,g_south,x_150,y_10/bo_3px_solid_white,c_fill,l_stormtrooper,w_300,h_300,x_-150,y_300/l_text:Impact_60_stroke:INSTAGRAM,co_white,g_south,x_-150,y_10/bo_3px_solid_white,c_fill,l_stormtrooper,w_300,h_300,x_150,y_150/l_text:Impact_60_stroke:TINDER,co_white,g_south,x_150,y_10/stormtrooper
So how do we spice this up? Colour replacement.
Colour replacement
This is a built-in Cloudinary effect that works with three parameters: the colour to apply, the threshold, and the target colour. Since it’s an effect, we apply it with the e_ prefix: e_replace_color:white:10:pink.
With that, we can pull off the following:
https://res.cloudinary.com/tamas-demo/image/upload/q_auto,f_auto/bo_3px_solid_white,c_fill,w_300,h_300,e_replace_color:pink:20:BCBEC5,g_face/stormtrooper
And applying colour replacement to each layer couldn’t be easier:
https://res.cloudinary.com/tamas-demo/image/upload/q_auto,f_auto/bo_3px_solid_white,c_fill,w_300,h_300,e_replace_color:purple:50:BCBEC5,g_face/l_text:Impact_60_stroke:LINKEDIN,co_white,g_south,y_10/bo_3px_solid_white,c_fill,l_stormtrooper,w_300,h_300,x_300,e_replace_color:green:20:BCBEC5/l_text:Impact_60_stroke:FACEBOOK,co_white,g_south,x_150,y_10/bo_3px_solid_white,c_fill,l_stormtrooper,w_300,h_300,x_-150,y_300,e_replace_color:orange:20:BCBEC5/l_text:Impact_60_stroke:INSTAGRAM,co_white,g_south,x_-150,y_10/bo_3px_solid_white,c_fill,l_stormtrooper,w_300,h_300,x_150,y_150,e_replace_color:pink:20:BCBEC5/l_text:Impact_60_stroke:TINDER,co_white,g_south,x_150,y_10/stormtrooper
That’s all there is to it. Enjoy creating your Dolly Parton memes.
Thank you to my colleague Dan for the idea & inspiration.