Adaptive image loading based on network speed
A concept built on the Network Information API, Service Workers and Cloudinary: serve lower quality images when the network is slow, speeding up the perceived load time of a web app.
The web has ballooned over the past decade, bringing remarkable technological advancement with it. Developer tools and frameworks can do extraordinary things. The trade-off: performance.
With JavaScript frameworks everywhere, the number of resources a website needs keeps climbing. Multiple JavaScript files, CSS files, media assets like images and videos. It all adds up.
Building a site that performs well is a constant fight. Connection speed, device capability, the sheer weight of assets.
There are plenty of resources showing how performance affects conversion and how it drives users away.
The Network Information API is in a draft proposal state at the time of writing.
Get the code
Visit this GitHub repository for the source code and setup instructions.
Serving images
Asset management matters, especially now that visually rich websites are the norm. More images means slower load times.
Some web applications can’t afford slow image loads. Think e-commerce. Profitability hinges on conversion rates. A few seconds’ delay loading product information and a potential buyer walks away.
Cloudinary offers two techniques for optimising image performance with minimal effort: q_auto and f_auto.
Automatic Quality and Format
Bolting the q_auto flag onto any Cloudinary image URL automatically adjusts and compresses the image without visible quality loss. A solid starting point for optimisation.
Different browsers support different image formats, each with its own compression approach. Chrome uses WebP, IE/Edge uses JPEG-XR. Using the f_auto flag, Cloudinary delivers the best format for the browser automatically.
Read this article on automatic image optimisation using Cloudinary and adaptive browser format delivery.
Network Information API
An experimental Web API with limited browser support, but a genuinely exciting proposal. It exposes connection information through an interface called NetworkInformation.
The interface reports the type of connection (e.g. cellular or wifi) and the speed (e.g. 4g or 3g).
Here’s sample code we can drop between <script> tags to grab network information:
Use Google Chrome (version 63 or above) as it has the best support for the Network Information API.
if (navigator && navigator.connection) {
  console.log(navigator.connection);
}
///
That returns something like:
NetworkInformation {
  downlink: 3.75,
  effectiveType: "4g",
  onchange: null,
  rtt: 150,
  saveData: false
}
The effectiveType property tells us what kind of connection the user has.
Serving images via Service Workers
This article won’t cover Service Workers in depth. The key thing: Service Workers let us intercept the request/response cycle, acting as a proxy between client requests and server responses. (With the power to modify both.)
Check out this free handbook on PWAs, including Service Workers to learn more.
Serve the right image using Service Worker
Service Workers intercept the request/response cycle. Because of that, we can swap in a lower quality image based on the network connection. That’s a powerful handle on image delivery performance.
First, a sample application displaying a single image:
<!DOCTYPE html>

<html lang="en">
  <head>
    <meta charset="utf-8" />
    <title></title>
    <meta name="description" content="" />
    <meta name="author" content="Tamas Piros" />
  </head>

  <body>
    <img
      src="https://res.cloudinary.com/tamas-demo/image/upload/pwa/hungarywp.jpg"
    />
  </body>
</html>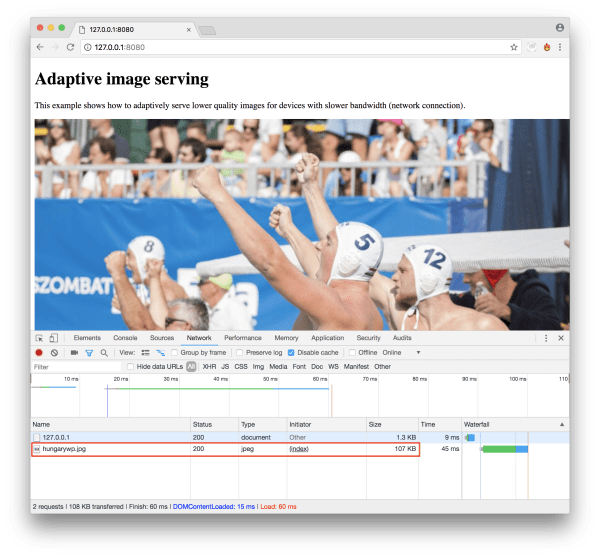
Loading this image takes minimal time; it’s 107 KB.
Cloudinary also serves images through a worldwide CDN, delivering from the location closest to the user. On subsequent loads, the response is faster because the image gets cached at the CDN layer.
The image is relatively lightweight already, but we can still do better. Remember, we can deliver the best format for the browser by bolting on the f_auto flag:
<img
  src="https://res.cloudinary.com/tamas-demo/image/upload/f_auto/pwa/hungarywp.jpg"
/>
We’re specifying a jpg in the application, but Cloudinary delivers webp because that’s the best format for Chrome. (That’s the f_auto flag at work.)
The image is now roughly 60 KB. We’ve shaved off nearly 50% without losing visible quality.
Even with that improvement, a slow 3G connection still has to pull the full 60 KB. That takes time.
Let’s bolt on a Service Worker:
// app.js
if ('serviceWorker' in navigator) {
  window.addEventListener('load', () => {
    navigator.serviceWorker
      .register('/sw.js')
      .then((registration) => {
        console.log(`Service Worker registered! Scope: ${registration.scope}`);
      })
      .catch((err) => {
        console.log(`Service Worker registration failed: ${err}`);
      });
  });
}

// sw.js
self.addEventListener('fetch', (event) => {
  event.respondWith(
    fetch(event.request.url, { headers: event.request.headers })
  );
});
The first block registers the Service Worker. The second is the Service Worker itself, kept dead simple for now: it listens to fetch events, intercepts them, and responds without modifying anything.

After the initial load, the Service Worker returns the image as shown in the screenshot.
Now let’s extend the Service Worker to modify image quality using the q_auto setting via Cloudinary:
// sw.js
self.addEventListener('fetch', (event) => {
  if (/\.jpg$|.png$|.gif$|.webp$/.test(event.request.url)) {
    const connection = navigator.connection.effectiveType;
    let imageQuality;
    const format = 'f_auto';
    switch (connection) {
      case '4g':
        imageQuality = 'q_auto:good';
        break;
      case '3g':
        imageQuality = 'q_auto:eco';
        break;
      case '2g':
      case 'slow-2g':
        imageQuality = 'q_auto:low';
        break;
      default:
        'q_auto:best';
        break;
    }

    const imageURLParts = event.request.url.split('/');
    imageURLParts.splice(
      imageURLParts.length - 2,
      0,
      `${imageQuality},${format}`
    );
    const finalImageURL = new URL(imageURLParts.join('/'));
    event.respondWith(
      fetch(finalImageURL.href, { headers: event.request.headers })
    );
  }
});
The
imageURLParts.length - 2call is specific to this code as it matches the Cloudinary folder path. You may need to adjust it for your Cloudinary folder name.
We check whether the requested resource is an image. If it is, we check the network speed. On 3G we reduce quality with q_auto:eco, on 2G or slower we drop to q_auto:low, otherwise we leave q_auto:best.
q_auto:bestuses a less aggressive algorithm. Bigger files, potentially better visual quality.q_auto:goodensures a relatively small file size with good visual quality.q_auto:ecouses a more aggressive algorithm, producing smaller files of slightly lower visual quality.q_auto:lowuses the most aggressive algorithm, producing the smallest files at low visual quality.
We then extend the fetch() handler so the newly assembled URL gets requested from the server.
As a bonus, we bolt on the f_auto flag automatically, so we can strip it from the HTML:
<img
  src="https://res.cloudinary.com/tamas-demo/image/upload/pwa/hungarywp.jpg"
/>
Loading the site on a slow 3G connection, the image weighs just 38.3 KB. That’s over 60% lighter than before. On WiFi (or fast 4G), we get the better quality image at around 60 KB.
Conclusion
We’ve shown how to wire up adaptive image sizing (quality and format automation) with the Network Information API and Service Workers. The Network Information API becoming available across all browsers would let us build sites that load faster, particularly on slow connections.