Setting up a Headless CMS on a VPS using Clouding.io
Please note that Clouding.io has sponsored this article.
VPS (Virtual Private Servers) are hosted virtual servers you rent from a provider. They give you stability, performance and flexibility. Owning one means you can run whatever you want on it. In this article, we’ll look at Clouding.io and spin up a custom server project. At the time of writing, they hand you a 5€ credit, which covers roughly a month of server time.
Getting started
Signing up with Clouding.io takes seconds. Register, and you’re ready to go.
Once logged in, you can start building your server. Clouding.io supports several operating systems: Linux distros like CentOS and Ubuntu, Windows Desktop & Server, plus pre-built apps like Docker, Ghost, Magento and WordPress.

After picking an OS, you configure the specs: vCores, RAM, SSD size. The price shifts based on what you choose.
That’s it. Name your server, and it gets provisioned.
Accessing the server via ssh
Next step: SSH into the machine.
Note that should we run into a situation when we need to access the machine ASAP, and we don’t have a terminal that we could use, we can always SSH to the machine using the Emergency Console feature which is found under the server settings.
How easy is it? You need the public IP address and the password. For this demo, I spun up an Ubuntu 18.04 server where the default username is root, so you’ve got root access out of the box. The password is visible in the dashboard. You can keep the default or swap it for something better (the server reboots when you change it, though).
Why have a VPS server?
What can you actually do with your own server? Pretty much anything. A VPS lets you:
- Host your site: LAMP stack, MEAN stack, whatever stack
- Run a blogging engine like WordPress or Ghost
- Do web analytics via Piwik
- Host your VPN via OpenVPN
- Run a private VoIP service using Mumble
- Sync files using BitTorrent Sync
- Deploy your own cloud using ownCloud
The list is endless. If you’d like to see some cool projects, I recommend visiting the r/selfhosted Reddit channel, where others are sharing their projects.
Hosting our own Headless CMS
For this article, we’ll host our own Headless CMS: Strapi. Strapi is an open source Node.js headless CMS. That’s a mouthful, so let’s break it down.
A headless CMS is a content repository you access via REST API calls. The “headless” part means there’s no frontend attached. (Picture chopping the head off a body: the head is the frontend, the body is the content.)
Setting up the pre-requisites
With a VPS, we can self-host Strapi and pull content into any project we like. This fits neatly into the JAM stack approach.
Let’s install Node.js on the server first:
curl -sL https://deb.nodesource.com/setup_12.x | sudo -E bash -
sudo apt-get install -y nodejs
Done. Now install Strapi:
npm install strapi@beta -gA CMS needs a database. Strapi supports SQLite, MongoDB, MySQL and Postgres. We’ll go with MongoDB. Since we own the server, we can install it directly:
$ sudo apt-key adv --keyserver hkp://keyserver.ubuntu.com:80 --recv 9DA31620334BD75D9DCB49F368818C72E52529D4

$ echo "deb [ arch=amd64 ] https://repo.mongodb.org/apt/ubuntu bionic/mongodb-org/4.0 multiverse" | sudo tee /etc/apt/sources.list.d/mongodb-org-4.0.list

$ sudo apt-get update

$ sudo service mongod start
Please note that we are not adding any security to this MongoDB instance at this time. Please read MongoDB’s notes on releasing a database instance to production and make sure that it’s secured accordingly.
Create a new CMS instance
Time to create the CMS:
$ strapi new cmsSelect “Custom”, pick “MongoDB” for the database, and accept the defaults. Strapi will install its dependencies. This takes a while.
Last setup step: start the instance (make sure you’re in the right folder; “cms” is the default):
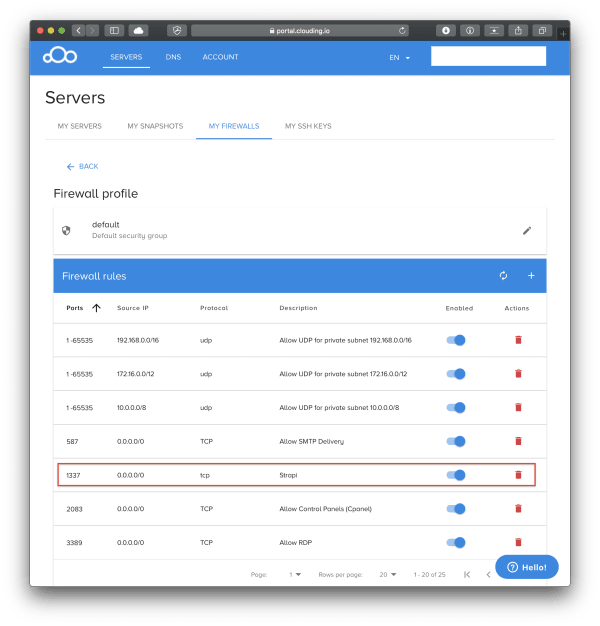
$ cd cms && strapi developStrapi is now running, but you won’t be able to reach port 1337 because the firewall blocks it. Head back to the Clouding dashboard, select your server, and click “My Firewalls.”
Find the default security group, hit the pencil icon, and add a rule for Strapi’s port.
After saving, navigate to http://[your-clouding-io.ip]:1337/admin. The Strapi interface should appear. Create a username and password, and your headless CMS is live.
Adding content to our CMS
Now for some content. Click Content-Type Builder, hit “Add new content” and give it a name. Add fields using the available data types: String, Number, Date, Boolean and so on. Hit “Save.” The new content type appears in the left sidebar.
Click on it to open the input screen where you can add entries.
To expose the data, go to “Roles & Permissions.” Select “Public” and tick the right permission (let’s choose “find”). You can now fire an HTTP GET at /employees (or whatever content type you created) and see the data come back:
http://[your-clouding.io-ip]:1337/employees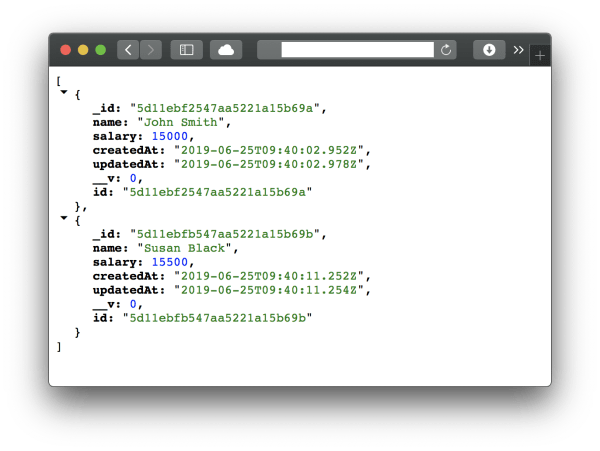
You’re set. Pull this data into any application you like: Gatsby.js, Nuxt.js, Gridsome, or anything else under the JAM stack umbrella.
Conclusion
Owning your server gives you serious flexibility. Clouding.io turned out to be easy to use and flexible enough that I could focus on building the CMS without fussing over infrastructure. Their dashboard makes creating, managing and running servers feel smooth.