Chapter 5Building agents
Onboarding the agent
22 min read · 7 of 22
What you’ll build
Open Cursor or Claude Code in a brand new repository, ask the agent to “add a new endpoint that returns user preferences.” Watch what happens.
It greps. It reads package.json to figure out the framework. It reads three or four files trying to pattern-match your routing convention. It reads your test setup. Sometimes it gets it right. Often it makes up a convention that looks reasonable but isn’t yours, and you end up rejecting the diff and writing a more specific prompt.
Now do the same in a repo with a 60-line AGENTS.md at the root explaining the framework, where endpoints live, the testing convention, and the PR style. The agent gets it right on the first try, with no greps and no guesses. The difference is that the second repo onboarded the agent. The first one didn’t.
Every chat session with an AI agent starts cold. The model doesn’t know your project, your conventions, your test runner, your deployment target, or what “done” means in your team. Onboarding the agent means putting that information somewhere the agent can find it, in a format it can read, on every session, the same way you’d onboard a new engineer with a README and a tour of the codebase.
The three most popular are the following:
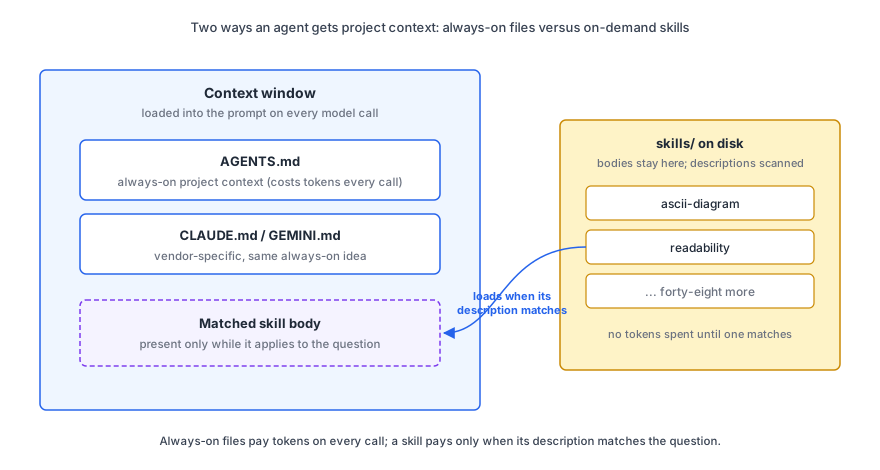
- AGENTS.md. Open standard, tool-agnostic, always-on project context. Read by Codex, Cursor, Jules, GitHub Copilot, Devin, Zed, and many others.
- SKILL.md. The open-standard format (agentskills.io) for on-demand agent capabilities. YAML frontmatter + markdown body. Originated at Anthropic and now supported across Claude Code, Gemini CLI, OpenAI Codex, GitHub Copilot, Cursor, and ~30 other agent products. Loaded only when relevant, so the body doesn’t sit in context until the agent needs it.
- CLAUDE.md/GEMINI.md. Vendor specific, used in vendor specific places (Gemini CLI, Claude Code and claude.ai).
This chapter walks through how these layers compose, how to write each one well, and evolves the running assistant.ts to load skills.
Concept 1: AGENTS.md
AGENTS.md is the closest thing the field has to a standard. The senior engineer joining your team today gets a README explaining what the project is, how to run it, and how the team works. The agent gets an AGENTS.md doing the same job, in the same place, on every session.
The official spec puts it bluntly: AGENTS.md is “a README for agents: a dedicated, predictable place to provide the context and instructions to help AI coding agents work on your project.”
The format is intentionally unopinionated. From the spec: “AGENTS.md is just standard Markdown. Use any headings you like; the agent simply parses the text you provide.”
The spec lists no required sections. The conventional ones, drawn from popular real-world AGENTS.md files:
- Project overview. What this is, in 2-3 sentences.
- Setup commands. How to install, run, build.
- Code style. Language conventions, formatter, linter rules.
- Testing instructions. How tests run, where they live, what counts as “passing.”
- Dev environment tips. Anything non-obvious about getting it running locally.
- PR / commit instructions. What your team expects in commits and pull requests.
- Things the agent should NOT do. DBs not to touch, APIs not to call, dirs not to edit.
A tight example for a hypothetical Node + TypeScript service:
# Acme API

Internal Node 24 + TypeScript service. Express HTTP, Postgres via Drizzle,
Redis for caching, deployed on Fly.

## Setup

- `pnpm install`
- `cp .env.example .env` and fill in `DATABASE_URL` (ask in #infra for the dev URL)
- `pnpm db:migrate` to run migrations
- `pnpm dev` to start the server on http://localhost:3000

## Code style

- TypeScript with `strict: true`
- ESM only (no CommonJS)
- Prefer `async`/`await` over `.then()` chains
- Named exports, no default exports
- Format: `pnpm fmt` (Biome)
- Lint: `pnpm lint` (Biome), must pass before PR

## Testing

- `pnpm test` runs Vitest
- New endpoints need an integration test in `src/<feature>/__tests__/`
- DO NOT mock Postgres in integration tests; use the test DB from `docker-compose.test.yml`

## Architecture

- `src/api/*`, HTTP routes, one file per resource
- `src/services/*`, business logic, framework-agnostic
- `src/db/*`, Drizzle schema and migration files (NEVER edit migrations after they're committed)

## What not to do

- Do not modify files in `src/db/migrations/` after they're committed
- Do not introduce new dependencies without approval (`pnpm add` requires review)
- Do not call third-party APIs without retry-and-timeout (use `src/lib/retry.ts`)
It reads like a README written for someone joining the team, and that’s the bar.
Common confusion: “I’ll have an LLM generate the AGENTS.md for me.” This is the worst thing you can do. In the 2026 ETH Zurich study, LLM-generated AGENTS.md files showed no benefit (a small, non-significant drop in task success) while raising inference cost by over 20%, and they scored significantly worse than developer-written files. The plausible-looking text sends the agent into broader, more expensive exploration. Write it yourself, by hand, based on what your team actually does.
The empirical picture.
Gloaguen, Mündler, Müller, Raychev, and Vechev (ETH Zurich / LogicStar.ai) published the first rigorous evaluation in February 2026, Evaluating AGENTS.md. Four agents, 138 tasks on CTXBENCH (their new benchmark) plus a SWE-bench Lite subset. CTXBENCH repos ran under three conditions (none, LLM-generated, developer-written); SWE-bench Lite has no developer-written files, so it compared none vs LLM-generated only. Headline: context files didn’t significantly move task success. Developer-written files added ~2.4% on average (p = 0.21); LLM-generated files reduced success by 0.5% on SWE-bench and 2% on CTXBENCH. The one significant gap: developer-written beat LLM-generated by ~7% (p = 0.038). And context files raised inference cost because the agent does more exploration: 20-23% for LLM-generated files, up to 19% for developer-written ones.
The mechanism: a context file makes the agent read more, test more, traverse more files (roughly 2.5 to 4 extra steps per task, depending on the file type and benchmark). The extra work sometimes pays off, but on average across the benchmark it doesn’t unless the file is minimal and written by someone who knows the project.
Two takeaways. Don’t ask an LLM to write your AGENTS.md: it was the costliest condition in the study and significantly worse than hand-written files. Keep human-written context minimal: only the constraints the agent can’t infer from the code (conventions, dangerous areas, build commands). If your linter enforces it, leave it out; the agent will find it from running the linter.
Concept 2: SKILL.md
AGENTS.md sits in the context window every call. Put your full database migration playbook in it, and you pay for those tokens on every interaction, even when the agent is just answering a CSS question. Skills solve this. Each skill sits on disk as a folder with a SKILL.md inside; the agent reads each skill’s description, and only the skill (or skills) whose description matches the current question gets followed. Either the agent picks autonomously based on the description, or the user can invoke a specific skill by name. A repo can have fifty skills covering fifty domains; the agent only “spends” attention on the one or two that match the user’s question.
The format is minimal:
---
name: my-skill-name
description: A clear description of what this skill does and when to use it
---

# My Skill Name

[Instructions here that the agent will follow when this skill is active]

## Examples
- Example usage 1
- Example usage 2

## Guidelines
- Guideline 1
- Guideline 2
Two YAML fields are required:
name. A unique identifier (lowercase, hyphens for spaces).description. A complete description of what the skill does and when to use it.
The description is the part that matters most. The agent reads the description to decide whether to load the skill. Vague descriptions get ignored. Specific descriptions get loaded at the right moment.
A working example, deliberately small so the skill mechanism is visible at a glance. This is skills/ascii-diagram/SKILL.md in the chapter’s code:
---
name: ascii-diagram
description: Use ONLY for questions about wire protocols (TCP, HTTP, TLS, DNS, gRPC), distributed-system message flows between two or more named participants, or hardware signal sequences. Do NOT use for language-level questions (syntax, semantics, type systems, scoping), library API usage, framework conventions, or any topic where the answer is naturally text-only. The model produces a labeled ASCII diagram of participants and the messages they exchange, followed by a single short paragraph explaining what the diagram shows.
---

# ASCII diagram

Every response must contain a labeled ASCII diagram followed by a one-paragraph caption.

## Form

1. Open with a fenced code block containing the diagram.
2. Use plain ASCII characters only: `-`, `|`, `+`, `<`, `>`, `=`, letters, digits, spaces.
3. Label every participant (component, node, actor) clearly.
4. Show direction with arrows: `--->` for outgoing, `<---` for incoming, `<-->` for bidirectional.
5. Label arrows with what they carry when useful: `--- SYN --->`, `--- HTTP GET --->`.
6. Close the code block, then write one paragraph (3 to 5 sentences) explaining what the diagram shows and the main takeaway.

## Style

- Diagrams should fit in 80 columns or less.
- No Unicode box-drawing characters (`│`, `─`, `┌`). Plain ASCII so the diagram renders in any terminal.
- One diagram per response. If the answer needs more than one, pick the most important.
- The caption is short prose. Don't bullet-list it.

## Example

Question: "How does the HTTPS handshake start?"

\`\`\`
Client                                          Server
  |                                                |
  | ---- ClientHello (cipher list, random) ----->  |
  |                                                |
  | <--- ServerHello (chosen cipher, cert) ------- |
  |                                                |
\`\`\`

The client offers a list of supported ciphers and a random nonce; the server picks one and replies with its certificate plus its own random nonce. From this point forward both sides have enough material to derive session keys.
This file lives in your agent’s skills directory (e.g. .claude/skills/ascii-diagram/SKILL.md for Claude Code; other agents use their own conventions). When the user asks “explain the TCP three-way handshake,” the agent reads the skill description, sees it matches (a protocol with a sequence of steps), and loads the file’s body into context. When the user asks an unrelated question (“why is my CSS broken?”), the skill stays on disk. That gives you depth without bloat.
A SKILL.md doesn’t have to be alone in its folder, it can reference the following as well:
scripts/. Executable helpers the skill can invoke. TypeScript, Python, Bash, anything the agent can run. Useful when the skill needs to do real work, not just give instructions.references/. Additional documentation that loads only when the skill body explicitly points to it. Long API specs, design tokens, architecture docs. Keeps the SKILL.md itself short.assets/. Static templates, images, sample data the skill references at runtime.
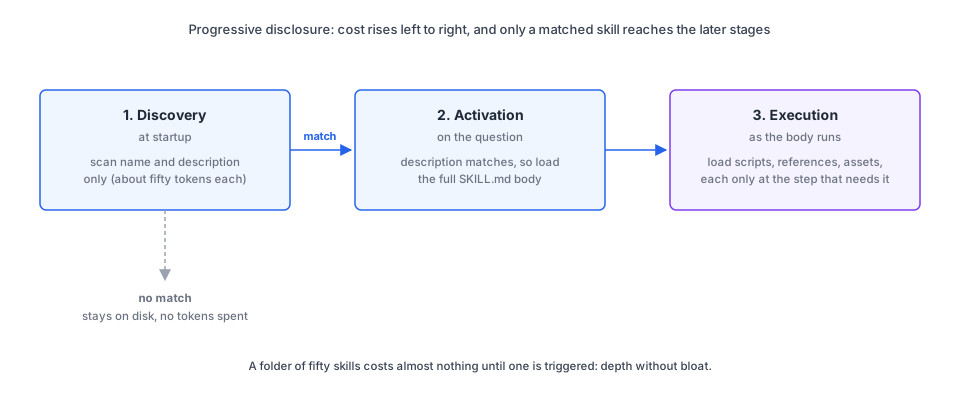
The pattern that makes this work is progressive disclosure: the agent scans skill metadata first (cheap), matches against the user’s request, and only then loads the full SKILL.md and any referenced files (more expensive but only when needed). A folder of fifty skills costs almost nothing in tokens until one of them gets triggered.
A complete skill: bundling code
The ascii-diagram skill is the simplest shape: two frontmatter fields and a body, no bundled files. The other end of the spectrum is a skill that ships a script and uses every part of the spec. The reason to bundle code is determinism: when a task needs exact computation, a model doing it token by token will confidently get it wrong, so the skill runs a script instead.
Readability scoring is a clean example. The Flesch Reading Ease score is arithmetic over word, sentence, and syllable counts. Ask a model for a document’s Flesch score and it invents a plausible number; run a script and you get the real one, the same every time.
The skill is a folder, readability/:
readability/
├── SKILL.md                 # metadata + instructions
├── scripts/
│   └── readability.ts       # counts words/sentences/syllables, computes the score
├── references/
│   └── FORMULA.md           # the formula and the score-to-band table
└── assets/
    └── report-template.md   # the report shape the agent fills in
The SKILL.md uses the full frontmatter. The body is condensed here; the shipped file in agent-skills/readability/ adds an example and edge-case rules:
---
name: readability
description: Scores English prose with the Flesch Reading Ease and Flesch-Kincaid grade formulas and flags the hardest sentences. Use when asked to check, score, measure, or improve how readable a README, doc, blog post, or any piece of writing is.
license: MIT
compatibility: Requires Node.js 24+ to run scripts/readability.ts
metadata:
  author: ai-eng-book
  version: "1.0"
allowed-tools: Bash(node:*) Read
---

# Readability

Score prose with the bundled script. Never estimate the score yourself: the
script counts syllables and sentences deterministically, which the model cannot
do reliably.

## Steps
1. Get the text (read the file the user named, or use what they pasted).
2. Run: `node --strip-types scripts/readability.ts <file>`
3. Read references/FORMULA.md to turn the score into a band.
4. Fill assets/report-template.md: score, band, grade, one fix per hard sentence.
Every field has a job. name and description are the only required ones, and the description does the real work: it lists the trigger words (check, score, measure, readable, README, doc) the agent matches against. license and metadata are housekeeping. compatibility warns that the script needs Node 24. allowed-tools (experimental) pre-approves exactly the tools the skill needs, Bash(node:*) to run the script and Read to load the text, so the agent isn’t asking permission at each step.
The three folders map onto the three reasons a skill needs more than instructions. scripts/readability.ts is the work: the counting and arithmetic the model can’t be trusted with.
function countSyllables(word: string): number {
  const w = word.toLowerCase().replace(/[^a-z]/g, "");
  if (w.length === 0) return 0;
  if (w.length <= 3) return 1;
  const groups = w
    .replace(/(?:[^laeiouy]es|ed|[^laeiouy]e)$/, "")
    .replace(/^y/, "")
    .match(/[aeiouy]{1,2}/g);
  return groups ? groups.length : 1;
}

const fleschReadingEase =
  206.835 - 1.015 * wordsPerSentence - 84.6 * syllablesPerWord;
references/FORMULA.md holds the score-to-band table (90-100 “very easy” down to 0-30 “very confusing”) and the grade formula. It loads only when step 3 tells the agent to read it, so the table never sits in context for the other forty-nine skills in the folder. assets/report-template.md is the output shape: a fill-in-the-blanks markdown report so every run looks the same.
That is progressive disclosure end to end:
- Discovery. At startup the agent sees only the
nameanddescription, about fifty tokens. - Activation. Ask “how readable is my README?” and the description matches, so the agent loads the SKILL.md body.
- Execution. The body sends it to run the script, read FORMULA.md, and fill the template, each loaded only at the step that needs it.
Run it in a coding agent (Claude Code, Gemini CLI, Cursor, and the rest all execute bundled scripts). Pointed at a dense paragraph, the script returns:
$ node --strip-types scripts/readability.ts draft.txt

{
  "words": 75,
  "sentences": 4,
  "syllables": 122,
  "wordsPerSentence": 18.8,
  "syllablesPerWord": 1.63,
  "fleschReadingEase": 50.2,
  "fleschKincaidGrade": 10.9,
  "hardestSentences": [
    {
      "sentence": "The deployment pipeline, which had been provisioned several months earlier by a contractor who was no longer reachable, occasionally failed in ways that nobody on the current team fully understood, and because the failures were intermittent and the logging was sparse, debugging them required a combination of guesswork, archaeology, and patience.",
      "words": 51
    },
    {
      "sentence": "Each stage does one thing, logs what it did, and exits with a clear status code.",
      "words": 16
    },
    {
      "sentence": "The new pipeline is small.",
      "words": 5
    }
  ]
}
The agent turns that into the report: Flesch 50.2 is “fairly difficult” (from FORMULA.md), and the 51-word opening sentence is the obvious thing to split. The number is exact and reproducible because a script produced it, not the model.
One caveat about where this runs. The running build’s assistant.ts (next section) loads skill bodies into the prompt, but it has no way to execute a script or read a reference on demand; that needs a tool loop, which is Chapter 6. A skill like this one is run by a tool-capable coding agent. To use it, drop the readability/ folder into your agent’s skills directory (.claude/skills/readability/ for Claude Code, the equivalent for others). The full skill is in code/chapter-05/agent-skills/readability/.
Concept 3: Tool-specific files, and the heavier formats
CLAUDE.md predates AGENTS.md. It still ships in Claude Code and claude.ai. Other tools have their own files (like GEMINI.md for the Gemini CLI).
CLAUDE.md has features AGENTS.md lacks:
@imports.@./src/conventions.mdpulls another file in, so you can keep the root file short.- Path-scoped rules. Separate rule files in
.claude/rules/, each with apaths:glob in its frontmatter, loaded only when the agent reads files matching the pattern.
Another relatively new spec is DESIGN.md which is Google’s open-sourced format from their Stitch design tool, a structured way to describe a design system (tokens, components, layout rules) so AI tools can read it directly. Useful if you’re building UI components with an AI agent and want consistent design-system adherence.
Evolving the running build
Time to apply this to the running build. Up to now the assistant’s system prompt has been hardcoded in TypeScript. The Chapter 5 evolution scans a skills/ directory at startup, loads every SKILL.md it finds, and lets the model decide per question whether any loaded skill applies; no flags, no manual invocation.
In code/chapter-05/assistant.ts:
import { readFileSync, readdirSync, existsSync } from "node:fs";
import { resolve, join } from "node:path";
import { GoogleGenAI } from "@google/genai";

const ai = new GoogleGenAI({});

const question = process.argv.slice(2).join(" ");

if (!question) {
  console.error(
    "Usage: node --env-file=.env --strip-types assistant.ts <your question>"
  );
  process.exit(1);
}

// Discover every SKILL.md under ./skills/<name>/SKILL.md.
// All skills go into context together; the model picks which (if any) to follow,
// based on whether each skill's description matches the user's question.
type Skill = { name: string; body: string };
const skills: Skill[] = [];
const skillsDir = resolve(process.cwd(), "skills");
if (existsSync(skillsDir)) {
  for (const entry of readdirSync(skillsDir, { withFileTypes: true })) {
    if (!entry.isDirectory()) continue;
    const skillPath = join(skillsDir, entry.name, "SKILL.md");
    if (!existsSync(skillPath)) continue;
    const body = readFileSync(skillPath, "utf-8");
    skills.push({ name: entry.name, body });
    console.error(`[skill] discovered ${entry.name} (${body.length} chars)`);
  }
}
if (skills.length === 0) {
  console.error("[skill] no skills/ directory or no SKILL.md files found");
} else {
  console.error(
    `[skill] ${skills.length} skill(s) in context; the model will decide which (if any) to apply`
  );
}

const baseInstruction = `<role>
You answer questions for a working developer. Use code-aware examples and assume programming familiarity. No marketing fluff. Be concise.
</role>

<rules>
1. For each <skill> below, read its description. If a skill's description matches what the user is asking for, follow that skill's body exactly. The matching skill is authoritative for output format and content shape.
2. If no loaded skill matches the question, ignore the skills and answer in short prose (3 to 4 paragraphs max, no markdown headings).
3. If the question requires current information, use Google Search.
</rules>`;

const skillBlocks = skills
  .map((s) => `<skill name="${s.name}">\n${s.body}\n</skill>`)
  .join("\n\n");

const systemInstruction =
  skills.length > 0 ? `${baseInstruction}\n\n${skillBlocks}` : baseInstruction;

const response = await ai.models.generateContent({
  model: "gemini-3.5-flash",
  config: {
    systemInstruction,
    tools: [{ googleSearch: {} }],
    maxOutputTokens: 2000,
  },
  contents: question,
});

console.log(response.text);
Lines 1-3. Imports. File-system helpers, path helpers, and the SDK.
Line 5. Standard client construction.
Lines 7-14. CLI argument handling. The whole rest of the command line becomes the question; no flags.
Lines 16-38. Skill discovery. Walk the ./skills/ directory at startup. For each subdirectory, if it contains a SKILL.md, read its contents into the skills array. This mirrors the canonical layout: one folder per skill, named after the skill, with SKILL.md at its root. The directory is scanned every run, so adding a new skill is “drop a folder, restart.” The final log line reports how many skills went into context.
Lines 40-48. The base instruction. Rule 1 is the one everything rests on: for each loaded skill, decide if its description matches the user’s question; if so, follow that skill exactly. That decision sits with the model. The base instruction never names a specific skill; it gives the model a rule for selecting between whatever skills got loaded.
Lines 50-55. Assemble the system prompt. Every discovered skill becomes a <skill name="..."> block; all blocks concatenate together. With one skill loaded, you get one block. With ten, ten blocks. The model reads all descriptions, but the rules tell it to follow at most one. This is also where the build stops short of full progressive disclosure: every body ships with every call, so you pay tokens for all of them whether or not one matches. That’s fine at this scale; loading a body only after its description matches needs the tool loop, which arrives in Chapter 6.
Lines 57-65. The model call. Same shape as Chapter 4, minus two things: the closing “Confidence” tag is gone because a matched skill now owns the answer’s shape, and the “Sources consulted” printout is dropped to keep the output focused on skill behaviour. maxOutputTokens: 2000 gives the model enough room for a structured output if a skill demands one.
Two test runs make the mechanism visible. The chapter’s skills/ascii-diagram/SKILL.md is the only loaded skill in both cases; what changes is whether the question matches its description.
Question that matches the skill (a protocol with a sequence of steps):
npm run ask -- "Explain the TCP three-way handshake."The assistant returns:
[skill] discovered ascii-diagram (2117 chars)
[skill] 1 skill(s) in context; the model will decide which (if any) to apply
\`\`\`
Client                                               Server
  |                                                    |
  |  --- SYN (Seq=X) ------------------------------>   |
  |                                                    |
  |  <-- SYN-ACK (Seq=Y, Ack=X+1) ------------------   |
  |                                                    |
  |  --- ACK (Seq=X+1, Ack=Y+1) ------------------->   |
  |                                                    |
\`\`\`

The TCP three-way handshake establishes a reliable full-duplex connection by synchronizing initial sequence numbers (ISN) between two endpoints. The process begins with the client sending a SYN packet containing its ISN, followed by the server responding with its own ISN and an acknowledgment of the client's sequence. Finally, the client sends an ACK to confirm receipt of the server's SYN, after which the connection enters the ESTABLISHED state.
The model read the skill’s description, recognised the TCP handshake as a wire-protocol message flow between two named participants, and followed the skill’s rules: diagram first, then a short caption.
Question that doesn’t match the skill (a JavaScript language question, nothing to diagram):
npm run ask -- "What's the difference between let and const in JavaScript?"The assistant returns:
[skill] discovered ascii-diagram (2117 chars)
[skill] 1 skill(s) in context; the model will decide which (if any) to apply
Both `let` and `const` are block-scoped, meaning they are only accessible
within the `{}` block where they are defined. Unlike `var`, they are not
hoisted with an initial value of `undefined`; instead, they remain in a
"Temporal Dead Zone" from the start of the block until the declaration
is reached...

The primary difference is that `let` allows for reassignment, while `const`
(short for "constant") creates a read-only reference to a value...

[further paragraphs of plain prose, no diagram]
Same skill discovered (same file in the system prompt). Different answer shape. The model read the same description, recognised that “let vs const” is a language-level question (which the skill’s description explicitly excludes), and ignored the skill. Rule 2 from the base instruction took over: short prose, no diagram. The log line [skill] discovered ascii-diagram means the file was found at startup, not that the skill was applied; the model’s behaviour is the only signal that tells you whether activation happened.
That’s the chapter’s mechanism in one comparison: the model decides per turn whether each loaded skill applies, based on the description matching the user’s question. Skills sit in context as a menu; the model picks from it (or doesn’t) based on what’s being asked. This is what an agent runtime is doing under the hood every time you see a skill activate.
Next up: the agent loop. The smallest production-shaped agent runtime: a loop bounded by an iteration cap and per-tool timeouts, with structured tool errors so one failed tool can’t kill the run. The new running build is a research-and-writing assistant that drives that loop end to end.